E-Mail:

If you enjoyed visiting this blog, please leave a comment or feel free to contact me by e-mail: timstanks@icloud.com

Search This Blog

Monday 28 January 2019

Cruel Seas - 3D Printing

One of the things about Warlord Games Cruel Seas that has impressed me is the amount of items that have become available for 3D Printing to support the game.

Double-sided Sticky Tape
A really good source of these is the "Cruel Seas - The Dock Office" Facebook group. It was here that I found my first 3D print - a three dimensional rendering of the cardboard freighter included as a template with the starter set.

Lifting prints - blue tape coming away from the bed.
Now I have a Wanhoa i3 hobby printer which has a very small (12x12cm) print bed. Most of the larger cargo vessels are much bigger than this and I'm afraid my technical prowess does not stretch to cutting up 3D designs to make them fit!

Trying printing with the parts orientated the other way...still lifted
Enter TheGreg1980 who has very kindly done just that! His  freighter model that can be found at https://www.thingiverse.com/thing:3345466, is cut into 3 pieces which will all fit on my bed at the same time! 

Third time lucky....about 5-6 hours to print.
I still suffer from the problem of prints lifting from my print bed as they build up, layer-by-layer. I started to use blue masking tape on the bed, followed by a liberal coating of Pritt Stick glue. This worked OK with smaller prints but not so well with anything larger.

MDF base added and florist wire masts
This time I had a brainwave and decided I'd try double-sided sticky tape on top of the blue masking tape!!

 Sea textured with acrylic paste
This worked OK - the print stuck rigidly to the tape - but the tackiness of the masking tape wasn't sufficient to keep that stuck to the bed. The upshot of this was lifting parts again.

Sides repaired with Milliput (before sanding)
I'm going to experiment with another hi-tack masking tape + the double-sided tape, next time.

Gaps filled and sanded
My first go at printing failed when the power lead mysteriously fell out of the rear of the printer and the printing stopped after about two hours.

Matt White primed
My next effort was going fine until I accidentally selected the wrong control and drove the heated nozzle into the finished rear hull with disastrous consequences.

Finally third time lucky I had a print I could use - albeit one which had lifted during printing.

Starting with the deck details
I straightened the hull parts as best I could using hot/cold water and decided the best way to assemble the model would be to mount it on mdf so I could ensure alignment and more easily fill any gaps.

I found two pieces of scrap mdf from another model, that glued together would make an ideal base. I then stuck the two hull halves onto the mdf using a "No More Nails" grab type adhesive, which had the advantage of filling most of the gaps around the hull base.

Finishing with hull etc.
Once thoroughly dry, I filled the remaining gaps and tidied up the sides of the ship with a little Milliput. Then textured the base using artists acrylic paste applied with a pointed pallet knife. This really is effective at simulating waves etc. The masts were added from florist's wire super-glued into the pre-printed holes and the bridge was super-glued to the superstructure on the rear hull.

I primed the vessel with matt white spray before painting the details with Vallejo Acrylics.


  • The main deck - Dark Grey
  • Rear Deck - Khaki Grey
  • Windows - Sky Blue
  • Lifeboat - Leather Brown
  • Funnel Black with a Red stripe
  • Hold Doors - White
  • Hull and remaining superstructures - Light Grey
  • Overall highlighting - matt white dry brush


The rust streak effects were made using a mixture of Flesh Wash + Orange Brown.

Sea painted with Blue Wash 
The sea was painted over with Army Painter Blue Wash and once dry, dry-brushed twice with Matt White to pick out the wave tips.

Hi-lights, weathering (Rust) and waves added to finished model
A quick coat of spray matt varnish to tie all the finishes together an she is ready for the table.

Ready to go!
A perfect replacement for the cardboard template, and a proper target for my torpedoes!


Friday 18 January 2019

Colin Penny (1957-2019)

I heard this morning that my wargaming opponent of 30+ years has passed away following a brave fight against cancer.
Colin Penny (1957-2019)
I will miss his company and his unpainted figures and hope that wherever he is now his dice always roll high........

RIP Colin.

Friday 11 January 2019

Warlord Games - Cruel Seas Finished Boats

Yesterday I completed the remaining vessels for Cruel Seas. All have been painted with a mixture of Acrylics (Vallejo & Citadel) followed by firstly a coat of Army Painter Satin Varnish and finally a coat of Anti-Shine Matt Varnish.

Vosper MTB I
Paints etc. used finishing both the Vosper MTB I & II were:-

  • Poundland Grey Spray Primer - overall undercoat
  • Grey blue - Deck & upper surfaces
  • Light Grey - Cockpit, Torpedo Tubes and any other above deck fixtures
  • Sky Blue - windows
  • Desert Yellow - wooden features (i.e. poles)
  • Yellow - Inflatable Dinghy
  • White & Red - life belts
  • Black - MGs
  • Camo Beige - ropes
  • Light Grey Vallejo Wash - over all surfaces of the  model
  • White - very light dry-brush
Vosper MTB II
The pennants from the starter set were simply cut out with a scalpel, folded and glued with PVA. Once dry they were attached to the mast with a thin bead of superglue. Finally the cut edges were blended into the printed surfaces with light grey Vallejo wash.

The ID Number decals were from some old Dragon 1/144 AFV kits.

S38 S-Boat

Paints etc. used finishing both the S38 & S100 S-Boats were:-
  • White Spray Primer (Wilko's) - Overall undercoat
  • Dark Grey - Deck & upper surfaces
  • White - Cockpit and any other above deck fixtures
  • Chain-mail Silver - Torpedo Tubes
  • Sky Blue - windows
  • Desert Yellow - wooden features (i.e. decking)
  • Black - Torpedo tips, Cannon Barrels & MGs 
  • Light Grey Vallejo Wash - over all surfaces of the  model
  • White - very light dry-brush
S100 S-Boat
Once again the decals came from my spares box. 

To fly a pennant a mast has to be added to the model. To do this I cut 20mm lengths of florist's wire, heated them in the flame of a candle and positioned them just behind the bridge. A small bead of superglue was added to ensure they never fall off.

The rust effect is obtained using a 50/50 mix of Vallejo Flesh wash + Orange Brown. This can then be added at likely rust spots (joins, edges doors etc.) and some "runs" added for effect.

Elco & Higgins PT Boats
And lastly my two free PT boats were finished in a Pacific Theatre finish. I've since learnt that they were supplied to the RN for use in the Mediterranean. So I could have painted them up the same as the Vospers. Oh well, not to worry. They'll come in for something one day.

Paints etc. used finishing both the Elco & Higgins PT Boats were:-
  • Poundland Grey Spray Primer - Overall undercoat
  • Brown Violet - Hull, Deck & upper surfaces
  • Dark Green - camouflage pattern
  • Light Grey - Torpedo Tubes
  • Leather Brown - ship's boat
  • Sky Blue - windows
  • Yellow - inflatable dinghy
  • Black - Cannon Barrels & MGs 
  • Black Wash - over all surfaces of the  model
  • Iraqi Sand - very light dry-brush
So there you go. All finished and ready to go. Hope its of some interest to those who have yet to start their paint jobs!


Tuesday 8 January 2019

Cruel Seas Ship Data Card Holder - Mango Terrain

I found these rather interesting items on eBay the other day.
(https://www.ebay.co.uk/usr/mango_terrain?_trksid=p2385738.m4383.c10)


They are simply designed mdf card holders that also allow you to track the loss of hull points value as your vessel takes hits.


Starting at £2 each (for a pack of 4), the price drops the more you purchase (£1.50 each if you buy 6). This price includes post and packing and, as you can see from the picture above, they come well packed. Time from placing the order to arrival was just 5 days.


A little assembly is required but it's not a big deal and instructions are included. The main parts come on two mdf sheets, the parts push out cleanly and you can glue them together with either PVA or (if you're in a rush!) SuperGlue.


The rings that slide over the hull points values come in a separate bag. Be careful to let the assembled sliders dry completely before completing assembly to ensure they can slide smoothly.


It's your choice whether you paint the finished item. I chose to just paint the rings red to help them stand out a bit more, but left the rest. If you turn the finished card holder over, there is a window cut out to reveal the points values printed on the card's reverse.

I rather like these. I think they are practical, good value and will prevent the cards coming to harm. The slight raised edge will also avoid damage counters ending up on the floor if the table gets knocked accidentally!

Thoroughly recommended.

Monday 7 January 2019

Zvezda 1/350th Project 1125 Armoured Patrol Boat - Cruel Seas Russian Fleet?

I saw these little models in the Hereford Model Centre just before Christmas and bought two as I thought they'd be just about the correct size to fit into Cruel Seas (at allegedly 1/350th scale).


Designed to go with their Art of Tactic game, the models were simple clip together items coming on a single sprue of green polystyrene.


Having now built them I'm not convinced they're truly 1/350th as they seem smaller than I'd expect them to be. However, looking at on-line pictures of the real thing it wasn't that big.


The model includes a scenic (water) base to display the model on, and of course a flag and associated hole for the game requirements.


There are choices to be made...T35 or T34 armoured turret to fit and T35 MG turret or Katyusha rockets.


Altogether a simple, quite finely detailed little model when built.


There are a number of colour schemes to choose from when you search on-line and I opted for a simple base coat of grey with light green stripes for camouflage.


The bases were painted the same way I painted the U-Boat - base coat of a grey blue from Vallejo, followed by Army Painter blue wash. Finally several dry-brushes of white were added until the desired effect was achieved.

Not sure if they will ever see the light of day on a table, but nice enough models all the same. At only £2.99 each they won't break the bank. I'm unaware if Zvezda have any plans to produce similar scaled opposition, but will keep my eyes peeled.


Warlord Games - Cruel Seas 2

Having watched Warlords YouTube play through of the opening scenario for Cruel Seas, and rather enjoying it, I asked myself can the game really be as broken as people were saying on the various forums?

To try and quantify this I decided to hand-write the errata/additions onto 50x35mm Post-It notes and add them in the appropriate place in the book. This way I'd have the changes to hand when I read through without the book being trashed by adding bits of paper that couldn't later be removed.

This took 20 Post-It notes to do as I ignored the trivial amendments to Scenarios and ship data.

Unexpectedly, I received the bonus miniature with my starter set - a surfacing/diving? U-Boat
Not ideal, but when you actually get to noting what the amendments really are, I must say they're not as bad as I was led to believe. In fact I can see how initially, no-one would have noticed had they played the game straight out of the box.

Simple to clean-up and assemble, it is quite a weighty piece being all white metal.
I think the issues lie mainly with the "Simulation" crowd (as opposed to the "Game" crowd) as they maybe take too many liberties with what might be termed historical "Accuracy"?

Painted up quite nicely
 Any how, Warlord have now come up with a pdf QRS which has the corrected details. This was three pages llong, but ten minutes with Windows wonderful Scissors application, and good-old PowerPoint, it has now become a double sided document that has all you need for play.

I added some old Dragon numbers for effect. Not sure how you can use it in the game though......
I've also invested in some rather nice mdf data card holders that incorporate sliding discs to replace the cardboard slider thingies that came with the game. These look rather good and I'll post a picture when they are assembled.

I've very nearly painted my initial fleets of freebies + starter set and am now looking forwards to trying them out.

Wednesday 2 January 2019

Warlord Games - 28mm SDKFZ 251 C Half-Track

This model was one of the first (if not the first) injection moulded AFVs that Warlord produced for their Bolt Action range.


To my shame I bought it straight away (£15 at Crusade 2013 I think) and then put it on the shelf and forgot about it.

Very few parts....a really quick build project!
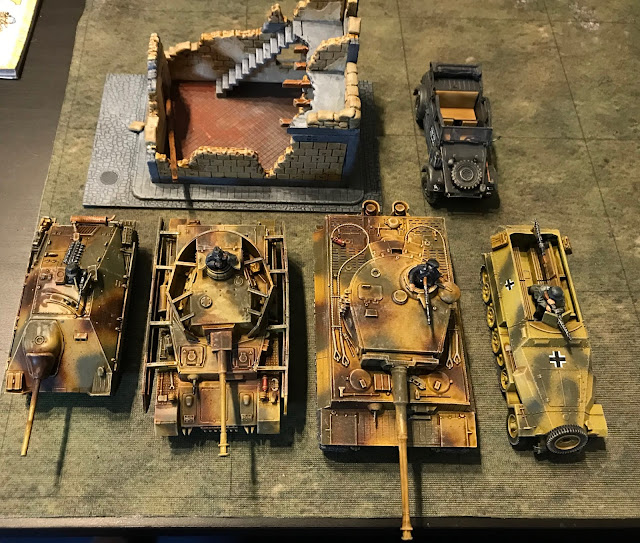
With my new found enthusiasm for 28mm it finally made its way onto the bench along with the other German vehicles I've described previously.

Worth holding the two hull parts together whilst the glue dries.
A simple model to assemble, with just enough detail for a wargames piece I found it a pleasure to build.

I kept the camo pattern simple on this one. Dark Yellow with green overspray.
It includes a figure firing the on board MG (MG34 or MG42 - both are supplied), but no one for the driver's seat.

The figure is a bit basic, but careful painting helps and its more than adequate
There are basic decals include together with some stowage (Jerrycans, helmets, spare wheel etc.).


The track and running gears units are moulded as one part and require some careful painting. The interior is best painted before assembly as it is difficult to access afterwards.

Altogether a good little model. Recommended.

Warlord Games - Cruel Seas

I guess like many of you, my attention was drawn to Warlord's pending release of a WW2 Coastal Warfare game - Cruel Seas.

One of my very first ever ventures into wargaming was to buy a Navwar 1/1200th coastal warfare beginners set. This was very complex using percentage dice to work out the probability of various actions. I still have it all in my storage boxes....not having seen the light of day for many years.


Warlord's promise of lovely 1/300 plastic models, combined with easy play rules all in a beautifully presented boxed set proved too tempting for words and I asked my dear wife to get me it for Xmas!


 To further water my appetite there have been a number of how to videos on YouTube, explaining the rule mechanisms and how to paint the models.

Then to really draw me in there have been freebie models on the last two month's editions of Wargames Illustrated!


In fact I was so taken with them I bought two copies of each to get the full selection of what was on offer (S Boats, MTB, PT Boat and torpedoes).

All was going so well and then the E word happened.........


Just days before I got to open my longed for pressie, the Cruel Seas Errata document appeared.....all TEN PAGES of it....

I cannot ever remember a newly published rules set coming out with this much in the way of errors, changes, FAQ etc. within just 1 month of being published? In fact, in my case, before I'd even got my hands on the bloody book!!

Perhaps the closest example would be the abortive publishing of BKCIII?


Now I feel deflated. I've painted up my free ships and am ready to go, but I'm having to read the rules while constantly referring to a pdf print-out in my other hand.....what a shambles. I think they suggest cutting out their amendments and gluing them into your rule book.....nice! I can see the people who shelled out for a signed hard-backed version just loving that!

I read some of Warlord's justifications on TMP and I have to say I found them quite condescending.

A very poor show indeed.


The comment that they've already sold out of the first print run and the next print run will be corrected doesn't really help me or many hundreds of others and I see they have no plans to replace our first issue documents.

Someone on-line likened their behaviour to GW. Interesting observation as the SMT at Warlord are all ex GW Alumni............

Time to make the most of a bad job I think........

Warlord Games - 28mm 38T Hetzer

This model only cost me £12 whilst at Colours in September. Once again this is a collaboration between Warlord Games & Italeri.


However, I suspect that this time, there is rather more Italeri input into the design than Warlord, as it is a more complex kit with a variety of options.

The kit comes in a surprisingly large box and can be built up either as a standard mid/late production Hetzer tank destroyer, Flammpanzer 38(t) or 2cm FlaK auf Hetzer reconnaissance/AA vehicle.


The later model has an open topped hull and interior detail and would probably lend itself to conversion to a recovery variant or experimental APC.

This is a more complex kit to build that the others and at times location requires holes to be drilled or cut out before assembly. And depending which variant you build, there will be a fair few parts to add to your spares box.


Gone are the simple pre-assembled running gear of the previous two models, this one needs to be built up wheel by wheel. An activity that requires patience and care to ensure alignment. The tracks themselves are in four parts per side and need care to ensure the joins are as invisible as possible.


The upper body I felt was 1mm too short and left a tiny gap at the rear between it and the lower hull, but this was easily disguised.


Included is a head & shoulders figure for the commander. It was here that I became suspicious of the scaling of the model as this figure looks way bigger than the commanders of the previous two kits. 


When placed alongside the Panzer IV for instance, the Hetzer looks quite large and I'm not convinced it is true 1/56th scale.....probably nearer 1/48th.


All the same it is a good model and really looks the part. I was going originally to finish in an ambush pattern as per the box art, but in the end settled for the same standard camouflage as the others two models.


There are a good selection of decals included as well as data cards and damage markers (coloured cotton wool) which is a nice touch.

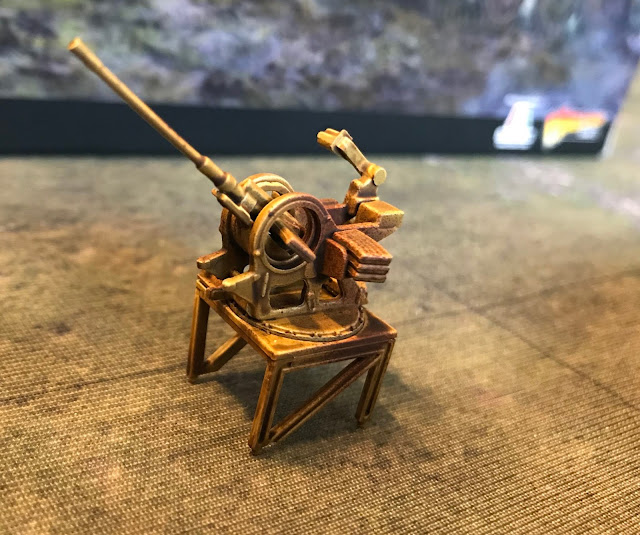
I made up the 2cm gun as it was such a nice model in its own right. Assembled carefully it rotates and elevates and includes separate magazines of spare cartridges. I'm sure I will find a use for it at a later date. I guess if you chose to build this option you would have to find a crew from somewhere else as none is included with the kit.


Usually retailing for £20 this was exceptional value for £12 and will soon grace my toy battlefields with its compatriots.