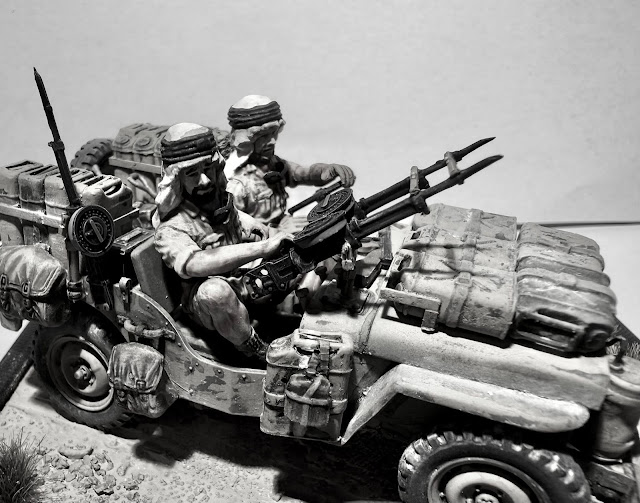
When I bought my Matchbox Monty's Caravan at the IPMS Show in Gloucester recently, I also treated myself to the Tamiya 1/35 SAS Jeep kit from the same seller.
This vintage kit was only £5 and I couldn't resist it. Originally released in 1974, I've actually assembled this kit twice before......but I wouldn't dare share the pictures with you! Once when it first came out and I was 12, the next time was probably from my mid to late 20's, which looked a little better.
I clearly remember the review in Military modelling highlighting some of the model's deficiencies....
- Lack of hose from radiator condenser
- No German pattern Jerrycans
- Jerrycans only having two handles instead of three
- Rolled cam net lack of detail
- Sand channels moulded together
- Wrong model of Browning MG (they include a .50" where I think the real vehicles mounted .303" ex-aircraft guns)
More recently, the two man crew figures have received criticism when compared to modern offerings.
I was determined to try and build this to the best of my ability, but without having to spend a fortune on after market add-ons. So to help, I bought myself a mixed thickness pack of Slaters micro strip and set about seeing what I could achieve.
Like all Tamiya kits, the parts go together like a dream. I assembled the jeep body & chassis and gave it an undercoat of Light Stone followed by some dark brown "Pre-shading". I then gave it a coat of Olive Green - my theory was that they would be delivered in this colour and it would show through any chips to a top-coat of Light Stone. Unfortunately I forgot to photograph this stage!
I sprayed the 6 wheels in a dark rubber grey and then sprayed the hubs in Light Stone using a stencil.
When dry I gave it a coat of chipping fluid - I'm still working on the best dilution for this for spraying. I think around 50/50% fluid/water (or thinner) - and once dry, followed with another coat of Light Stone.
Then careful application of water, a stiff brush & cocktail stick gave me the well worn effect I was after.
While that all dried I started cleaning up & assembling the cargo and weapons for the vehicle.
Every jerrycan needed a lot of work. The seams had to be sanded smooth and a central handle added after the outer two were thinned down. I guess for completeness I should have done something to the fuel caps to up the detail there, but didn't think about it at the time.
Once they were all dry I grouped them together and, using microstrip, constructed frames to hold them together in the vehicle. the half dozen or so famous wartime photographs of these jeeps widely available on line give you plenty of inspiration.
I also took a look at the rolled cam nets. These had a criss-cross pattern moulded in that wasn't at all convincing. To mask this I first tried multiple coats of Mr Surfacer 1500. This helped but was a slow process. Next I tried liquid Greenstuff, but this was no quicker. Finally I coated them using Vallejo Grey Pumice (a basing texture) which worked a treat!
The hose question was easily answered using a short piece of brass rod. The condenser was heated with a flame to distort it slightly to mimic the ones seen in the photos.
I painted all the stores (Ammo boxes, ration crates, small arms, shovel etc.) separately and then test fitted them in the jeep. Once I'd picked out the jeep hull details (dashboard etc) I glued them all in place.
I think the figures aren't too bad. The poses are quite natural compared to many Tamiya figures of the time, and well proportioned. Ok the details is a little soft, but nothing that a good paint job can compensate for.
Firstly, they need assembling. This needs some care to ensure the hands match up with the steering wheel and Vickers K guns (I'd opted for these as they are historically accurate unlike the 50 cal.). Then they need some extensive cleaning up to remove the mould seams and fill the gaps.
Before final assembly, everything was given a coat of ultra-matt varnish to seal and blend everything together. The base was 3D Printed to match. The surface area was artists medium with scattered sand, followed by sprayed coast of various sandy shades. Some grass tufts just finishing things off.
I'm very pleased with this one. Its an old kit with it's limitations but still builds into a lovely little replica. I'll let the photographs of the finished model do the talking...


No comments:
Post a Comment