E-Mail:

If you enjoyed visiting this blog, please feel free add a comment after the article in question :-)

Search This Blog

Showing posts with label Warlord Games. Show all posts

Wednesday, 7 May 2025

Warlord Games 1/56 M10 Tank Destroyer & Rubicon 17pdr SP Achilles

 Some time ago I bought the Rubicon M10/Achilles kit for my stash, but only decided to build it when I received the Warlord M10 model as part of my recent Bolt Action £100 Bargain Box.


My thinking was I'd compare the two to see which I preferred.


To be honest, there was little to pick between them, as they both went together very well and are almost identical in size, so could be used on the table together.

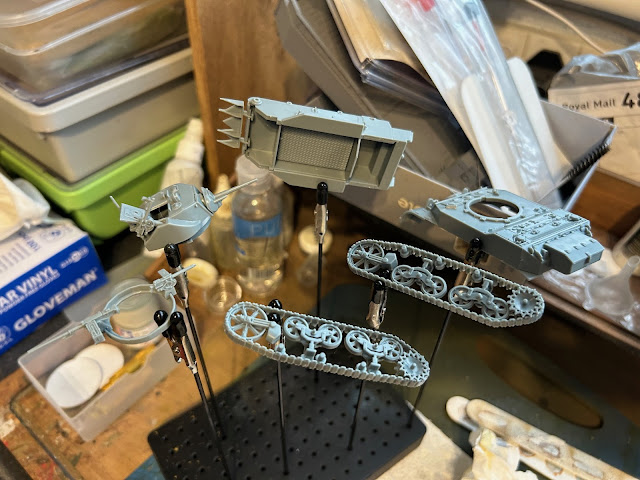
The Rubicon model is in the lefthand tray and the Warlord model in the righthand tray - Primed ready to spray

There are pro's and con's with both, but nothing that sets one apart from the other. It's down to what do you need in a model? I've tried to summarise the comparisons in the table below


If it's variety, then the Rubicon allows more options. If it's a crewed vehicle, then the Warlord model has this covered. You'll need to invest in aftermarket figures for the Rubicon - as I did. Don't forget to watch what glue you use. The ABS used by Rubicon needs something like Tamiya Extra thin cement - not standard polystyrene glue.


Incidentally, these figures came from eBay, 3D resin printed by Garrison Miniatures. They needed very little clean-up (just an odd bobble of resin where the supports were attached) and painted up extremely well.

Nice figures, depicted in their cold weather "Pixie Suits"

I painted the vehicle in almost identical schemes for initial comparison. I pre-shaded with a dark panzer grey, before over-spraying a couple of coats of thinned Olive Drab.


I then sprayed the centres of each panel with a slightly lightened Olive drab to add some depth. The panel detail was brought out with a Dark Brown pin-wash, before a light dry-brush of Iraqi sand.

17pdr. SP Achilles - Rubicon

Finally I added some dark Chocolate brown chips and a dusting of AK powders. All paints were Vallejo. Finally both received a coat of Lucky Ultra-matt varnish.

M10 Tank Destroyer - Warlord/Italeri

I had already decided I'd paint the M10 to represent a Battle of the Bulge vehicle. To do this I masked the big areas of the vehicle that I did not want covered in whitewash, with decorators tape. Then areas like the open turret top and vehicle markings were masked with AK masking putty.


This is weird stuff to use, but works well. As I masked it one evening and painted the following day, the putty settled until it completely filled the turret! Easy enough to remove, but weird.


I then sprayed with AK Washable White Paint. I haven't used this before, but I'm really impressed! It does exactly what it says on the tin. Once dry I washed some off with water and a stiff brush to give a very realistic worn finish. Finally another coat of Lucky Ultra-matt and some AK powders.


Both of these were good models to build, I'd recommend them both!


M36 90mm Turret included with Rubicon model


Friday, 30 August 2024

Rubicon 1/56 M5A1 Stuart

 As part of my cut price stash from the IPMS Avon show, I bought a Rubicon M5A1 Stuart for £12.

I decided I’d paint this up as a British vehicle but in its delivered Olive Drab colour.

As with every Rubicon kit I’ve made, it comes with two sprues & decals bagged separately and a very clear and detailed instruction booklet. The parts are moulded flash free in a light grey hard plastic and offer a number of options for the builder.

Turret completed with hatch open and test fit for Warlord figure

There’s early, mid and late production engine deck details, turret MG armour shield, turretless MG armed recce version, mudguards on/off, Cullin hedgerow device, turret hatches open/closed…… plenty of choices.

Track units before assembling inner drive sprocket and suspension details

I built the model more-or-less following the instructions; however I left the track units off to ease painting.

Main lower hull components include a checker-plate floor which you will see if you opt for the turretless recce version

The completed sub-assemblies awaiting primer

There really weren’t any issues during assembly, it took less than 30 minutes including cleaning up the parts! The only small point I’d note was that the front mudguards are moulded as part of the hull, whilst the rear mud flaps form part of the combined side mudguards. I cut these off and attached them individually as this is where divisional and unit markings would be displayed.

Matt White primed sub-assemblies

Parts just clipped together to illustrate the Recce Version. You have the choice to swap turret for MG ring after you've finished the model so you really have two vehicles in one!

Once assembled, I spray primed all the finished sub-assemblies with matt white. I thought I’d try my hand at “pre-shading” so sprayed all the areas of shade with a dark Panzer Grey before giving the whole AFV a spray coat of Vallejo Olive Drab. I’m not convinced this made any real difference though, so I need to experiment more.

Track units carefully sprayed in Olive Drab, to leave tracks dark grey

I was careful to only spray the running gear Olive Drab, leaving the track in Panzer Grey as it is of the rubber pad type.

All the weathering finished prior to pigments and matt varnish

Weathering consisted of firstly dry-brushing the entire model with lightened Olive Drab to give some variation across the AFV’s panels. I then painted the pioneer tools and applied the decals.

What the vehicle looks like in Recce mode there were another two .50" MGs you could add!

Next, I used Army Painter Dark Tone wash around all raised detail and shadow areas. When all was dry a light dry-brush of Vallejo Iraqi Sand was applied overall.

After the first application of pigments

I used Army Painter Rust Wash to treat the track joining pieces and ran a few rust streaks around the tank where I thought they’d naturally occur.

Finished model with re-applied pigments😅

Finally, a new one for me, I used some Vallejo Earth Pigment powder to further weather the vehicle. This looked really good until…..

In the colours of a Guards Division Brigade HQ vehicle. Note the rear mud flaps taken from the side mudguard moulding


Last job was to spray an overall coat of AK Lucky Ultra-Matt varnish which promptly blew off all my pigment powders!!

I waited until all was dry and re-applied the pigments and this time fixed them in place with dilute PVA.


I added a spare commander figure from the Warlord Sherman Firefly and I was done.

Fantastic little model, highly recommended.

Friday, 2 August 2024

Warlord Games 1/56 Sd.Kfz 234/2 Puma Heavy Armoured Car

 Enjoying my current spate of AFV modelling, I decided to stick with the 1/56th scale to go with my 28mm figures and for speed of assembly.

At last month’s North Somerset Model Show, held at the Weston-Super-Mare Helicopter Museum, I bought myself the Warlord/Italeri Puma model for the princely sum of £17.

Incidentally, this is a superb museum with (at my guess) 50+ different Helicopters on display including an awesome ex-East German Hind D!


I’m planning to display my 1/56th AFVs at this coming weekend’s IPMS Model Show at Thornbury, Avon, so thought if I got a move on, I could add this to the collection.

Once again, a simple kit contained on just two sprues. However, there is a good deal of detail incorporated.

The instructions are basic but adequate. You start by assembling the lower hull and suspension, which is a little complex, so needs care. The detail includes the leaf springs, drive shafts, track-rods etc. and really looks very good.

Fit of parts is generally very positive, with little or no flash encountered. The rest of the assembly is very straight forwards, and I left the wheels off to make it easier to paint the hull. If I have one complaint, it is the wheels. They are hollow which is a real shame given how detailed the rest of the kit is. Not really visible on the finished model but could have been better.

I went for a typical German paint scheme of Vallejo Air Dunkelgelb, over sprayed with Vallejo Brown Wash once dry.


The wheels were sprayed with Citadel Black Templar Contrast paint before picking out the hubs firstly with Army Painter White (Their new paints have incredible coverage!) followed by Vallejo Air Dunkelgelb & Brown Wash.

Then I over sprayed stripes in Vallejo Air Olivegrun before adding decals. These I took from some Rubicon spares as I felt the kit decals were too large.

There is a single half-figure commander included that’s nicely sculpted and easily painted.

The pioneer tools etc. were picked out individually before using Army Painter Strong Tone wash to fill the grooves & crevices.

Once all was dry, the model was given a dry brush of Vallejo Iraqi Sand before spraying a coat of matt varnish to blend everything together.

A really nice addition to the collection, recommended.

Wednesday, 31 July 2024

Warlord Games 1/56 Panther Ausf A

 Another of the models bundled in with the Achtung Panzer starter set. A joint venture between Italeri & Warlord the parts are incorporated in just two sprues.


The model is moulded with Zimmerit coating and was crisp and flash free.

There are a couple of areas to take care with, especially as the Warlord build instructions are somewhat simplified and vague.


The simplified running gear comes moulded as one piece with a separate outer drive sprocket. The track lengths are split in two – top and bottom runs. When attaching the sprocket be careful to align it correctly (it only has partial drive teeth) and note that while it appears to have a “keyed” location pin, this is not the case.


The engine cooling vents are open with no detail behind them. You could simply paint the space behind in matt black, but I covered the underside with gaffer tape to seal the gaps.


I opted to leave off the tracks to make painting easier. I’m not sure this was the best option, however, and I’ll explain why later.

The hull top needed a bit of masking tape to hold the glacis plates together while the cement went off, but otherwise everything went together really well.


The turret is a simple construction with well defined Zimmerit and has to option to leave the gun barrel moveable. I opted to fix mine in place. I left the top turret hatch open to accommodate the included tank commander half figure.


After priming in white, I gave the whole vehicle a coat of Vallejo Air Dunkelgelb using my new compressor & airbrush. Once dry I over sprayed a striped camouflage pattern of Rotbrun and Olivegrun.


When dry I, I applied the included decals using Vallejo decal fix & set.

Most of the hull detail is moulded in place, and whilst a little low on profile & detail, paints up OK.

I then gave everything an overall spray of Vallejo brown wash to help pick out the Zimmerit pattern.

Now it was time to fit the tracks. These had been sprayed on the sprue with Army Painter Plate Armour, before a coat of Vallejo Black Wash and finally a coat of Army Painter Rust Wash. The very last step was a dry-brush of Vallejo Silver on the high points.

I realized (too late!!) that the tracks are “handed”. They should be fitted with the points where you removed them from the sprue, on the INSIDE (i.e. out of sight). Armed with hindsight I won’t make this mistake when I assemble the second model - I will leave off the running gear and attach it complete at the end. But in this case, to get the upper run of tracks to fit, I had to remove some track teeth.

I’d read elsewhere that they were not a good fit, and indeed this was the case. It was very difficult to get them to meet at both ends and I ended up having to make a tiny bead of filler to close the gaps, before repainting. To ensure the tracks were held down on the upper surface of the heels I slotted in a short section of sprue which would be out of sight when I attached the side plates.

Finally, when all was complete, I gave it an overall dry-brush of Vallejo Iraqi Sand followed by a coat of Ammo Colours Lucky Ultra-Matt varnish to tie everything in together. This really is the very best matt varnish I have ever used.

What do I think of the model? Well as a completed kit it looks very good. It definitely captures the look of the Panther. On the downside, the tracks could have been a much better fit and I wish the pioneer tools and tow rope had a little more definition. On balance I would like to compare it to Rubicon’s offering to see who has the better version.