E-Mail:

If you enjoyed visiting this blog, please feel free add a comment after the article in question :-)

Search This Blog

Showing posts with label 3D Printing. Show all posts

Wednesday, 31 August 2022

DAK Attack – LRDG Patrol

My patrol vehicles are now completed. As discussed previously, I 3D printed them in roughly 1/130th scale, using Bergman .stl files from Thingiverse.

His LRDG Chevrolet files are many and varied…..Windscreen up/down etc. etc. together with a multitude of armaments.

Includes the two 15mm trial prints at the back and a trial SAS jeep I printed too

What they lack are crew figures.

I found some very good 15mm scale sculpts of a SAS jeep crew on Thingiverse that fitted the bill nicely. There are three figures in the set, a driver with steering wheel, a crew member with Bren Gun and an empty-handed crew member. All are seated with their lower legs missing and wearing Arab head-dress.

Using these figures, I was able to crew up every vehicle.

 Following the guidance of the rule book (and the Osprey book on LRDG) I created a mid-1942 half-patrol.

  • Two “Pilot” jeeps – like SAS jeeps but only armed with 1 x twin Vickers “K” guns
  • One Wireless Chevrolet - aerial & forward facing .50" HMG
  • One Medical Chevrolet - Rear facing twin Vickers "K" guns
  • One Fitters Chevrolet – additional wooden chest for spares & tools
  • One “Scorpion’s Tail” Chevrolet – mounting a captured 20mm Breda cannon

I’ve also received from Pendraken 30 x  Afrika Korps figures, 3 x Motorcycle Combinations and a pack of 10 x Commandos – to use as dismounted LRDG crews.

I’ve mounted them in pairs & singles and am about to commence the painting.

Monday, 15 August 2022

Random Printing Activity....

 Over the last week or so I was stuck in isolation due the dreaded "Rona". Once the initial symptoms had faded, but still testing positive, I got a bit of printing done.


Firstly I got the patrol vehicles for DAK Attack produced in 1/130th scale. Here's the Breda 20mm cannon armed example.


My next venture is for a long standing ("Back Burner") project - playing the D-Day landings. My enthusiasm has been fired once more to get on with this by the new Rapid Fire Reloaded scenario supplement which follows the Canadian army in from JUNO beach commencing with the landings at Courcelles (Wn 36 & 37 if my memory serves me well). 


These scenario requires you to field LCT4's, LCMs and LCAs. The latter two are available as .stls from the ever prolific Marco Bergman. However I couldn't find a workable LCT4 file.


I decided I'd knock one together myself! This is the result, broken into parts so it will fit my printer's bed and drawn up in 3D Builder using some blown-up features from the LCM.


You'll have to forgive the lack of historical accuracy, these were largely created in my mind!! I just wanted a model that could accomodate 6 or so Sherman tanks so that's where the size came from. You can see my Sherman Crab hull (another creation for my D-Day collection) which will give you an idea of size. Alongside is Marco Bergman's LCA model complete with two crew figures already sculpted in place. This is a lovely file and prints in one piece. These have been primed using Grey Automotive undercoat and are awaiting weathering and detailing.


Finally, I got around to creating an arable farmed square for my Strength & Honour games. Its 3D printed with sand glued on top with PVA. I've only made one so far but will do a few more when I get time, painting them up in a variety of colours to make them all look slightly different. This is 100x100mm to exactly fit my grid squares.


Wednesday, 10 August 2022

DAK Attack

 Having read through my DAK Attack ruleset, I'm quite taken with their simplicity and approach to solo gaming.


The basic game is based around a half patrol of LRDG vehicles carrying out a raid on an airfield or similar and afterwards surviving its journey back to friendly lines.

The initial raid has rules for all the activity you would need (laying charges, firefights, carrying out running repairs to vehicles and crew) and a simple card based AI to control the DAK forces ranged against you.

Once the raid is completed, the surving vehicles and their crews must make their way back home. This is controlled by the cards once again. Firstly you decide how many days this will take you to complete. Then deal yourself that many cards from the deck. Pick a card for the first day and follow the instructions....

This could be setting an ambush, or being ambushed, collecting water from an oasis, putting in a road watch operation etc. etc.


You just work your way through each day and when (if!) you get back you can total your victory points to see how successful you've been. 

The game is aimed at 20-28mm figures but I'm thinking I'd like to try it at 12mm (or my home grown 1/130th  scale). To this end I've tried printing off some of Marco Bergman's lovely little SAS Jeeps & Chevrolet 15cwt trucks. The pictures show my 1/100th and 1/130th versions and a battlefront example for comparison.

An example 1942 patrol comprised 2 x "Pilot" Jeeps armed with twin Vicker 'K' guns and 4 x Chevrolet 15cwt trucks - 1 x radio vehicle, 1 x Fitters vehicle, 1 x Medical vehicle and 1 x "Scorpion's tail" or Breda 20mm cannon armed vehicle.

The Bergman files are fantastic as they provide every possible example of Chevrolet truck  armament so you can depict 4 individual vehicles for your patrol similarly you can do the same with the jeeps. Searching Thingiverse also throws up 1/100th scale seated crew figures you can use to populate the patrol.

All I'll need to get are some Pendraken DAK figures and I'll be away! 


Sunday, 12 June 2022

Strength & Honour - 2mm Ancients (7)

 I decided to have a check up on what I've created to date for Strength & Honour. This was to confirm if there's anything else I think I need to print, and to enthuse me to get on and actually try a game!

My Roman Army.

Fortuitously, I printed my bases at 80mm width and 45mm depth. This meant that I could pack them away quite safely in a 1.5 litre Really Useful Box. I could fit 7 bases to a layer, protected simply by a strip of bubble wrap. There was room in the box for all my figure bases...that's two enormous armies + their encampments!!

Look how portable this system is!

I already had a Deep Cut Studio gridded (100x100mm) mat that I will use to play on and steered my choice for base colouring.


The remainder of what's needed to play fitted into another Really Useful Box - this time one holding 1.6 litres. I printed out Command Boards reduced in size to match the box dimensions so they could all be stored together. Also in this box is room for all my terrain pieces, the Disaster & Set-Back cards, some "Disordered" tokens I printed off and some Roman coins to use as Command Tokens. I've printed off some of Mark Backhouse's name labels and intend to fix those to their bases using good old-fashioned Blu-Tack.

Doh! I thought I'd printed 9 wood bases.....

This has proved a worthwhile exercise, as I've noticed that I'm a wood base short of what I thought I'd printed, so that's on the printer as I type.

My Gaul/Ancient Briton Warband based Army

I really pleased with all these. Its the first time I've been able to take up a new period/rules and created everything I need for myself - nothing purchased but the rules! If only I could find the time to get on and try them out......


Sunday, 24 April 2022

Strength & Honour -2mm Ancients (5)

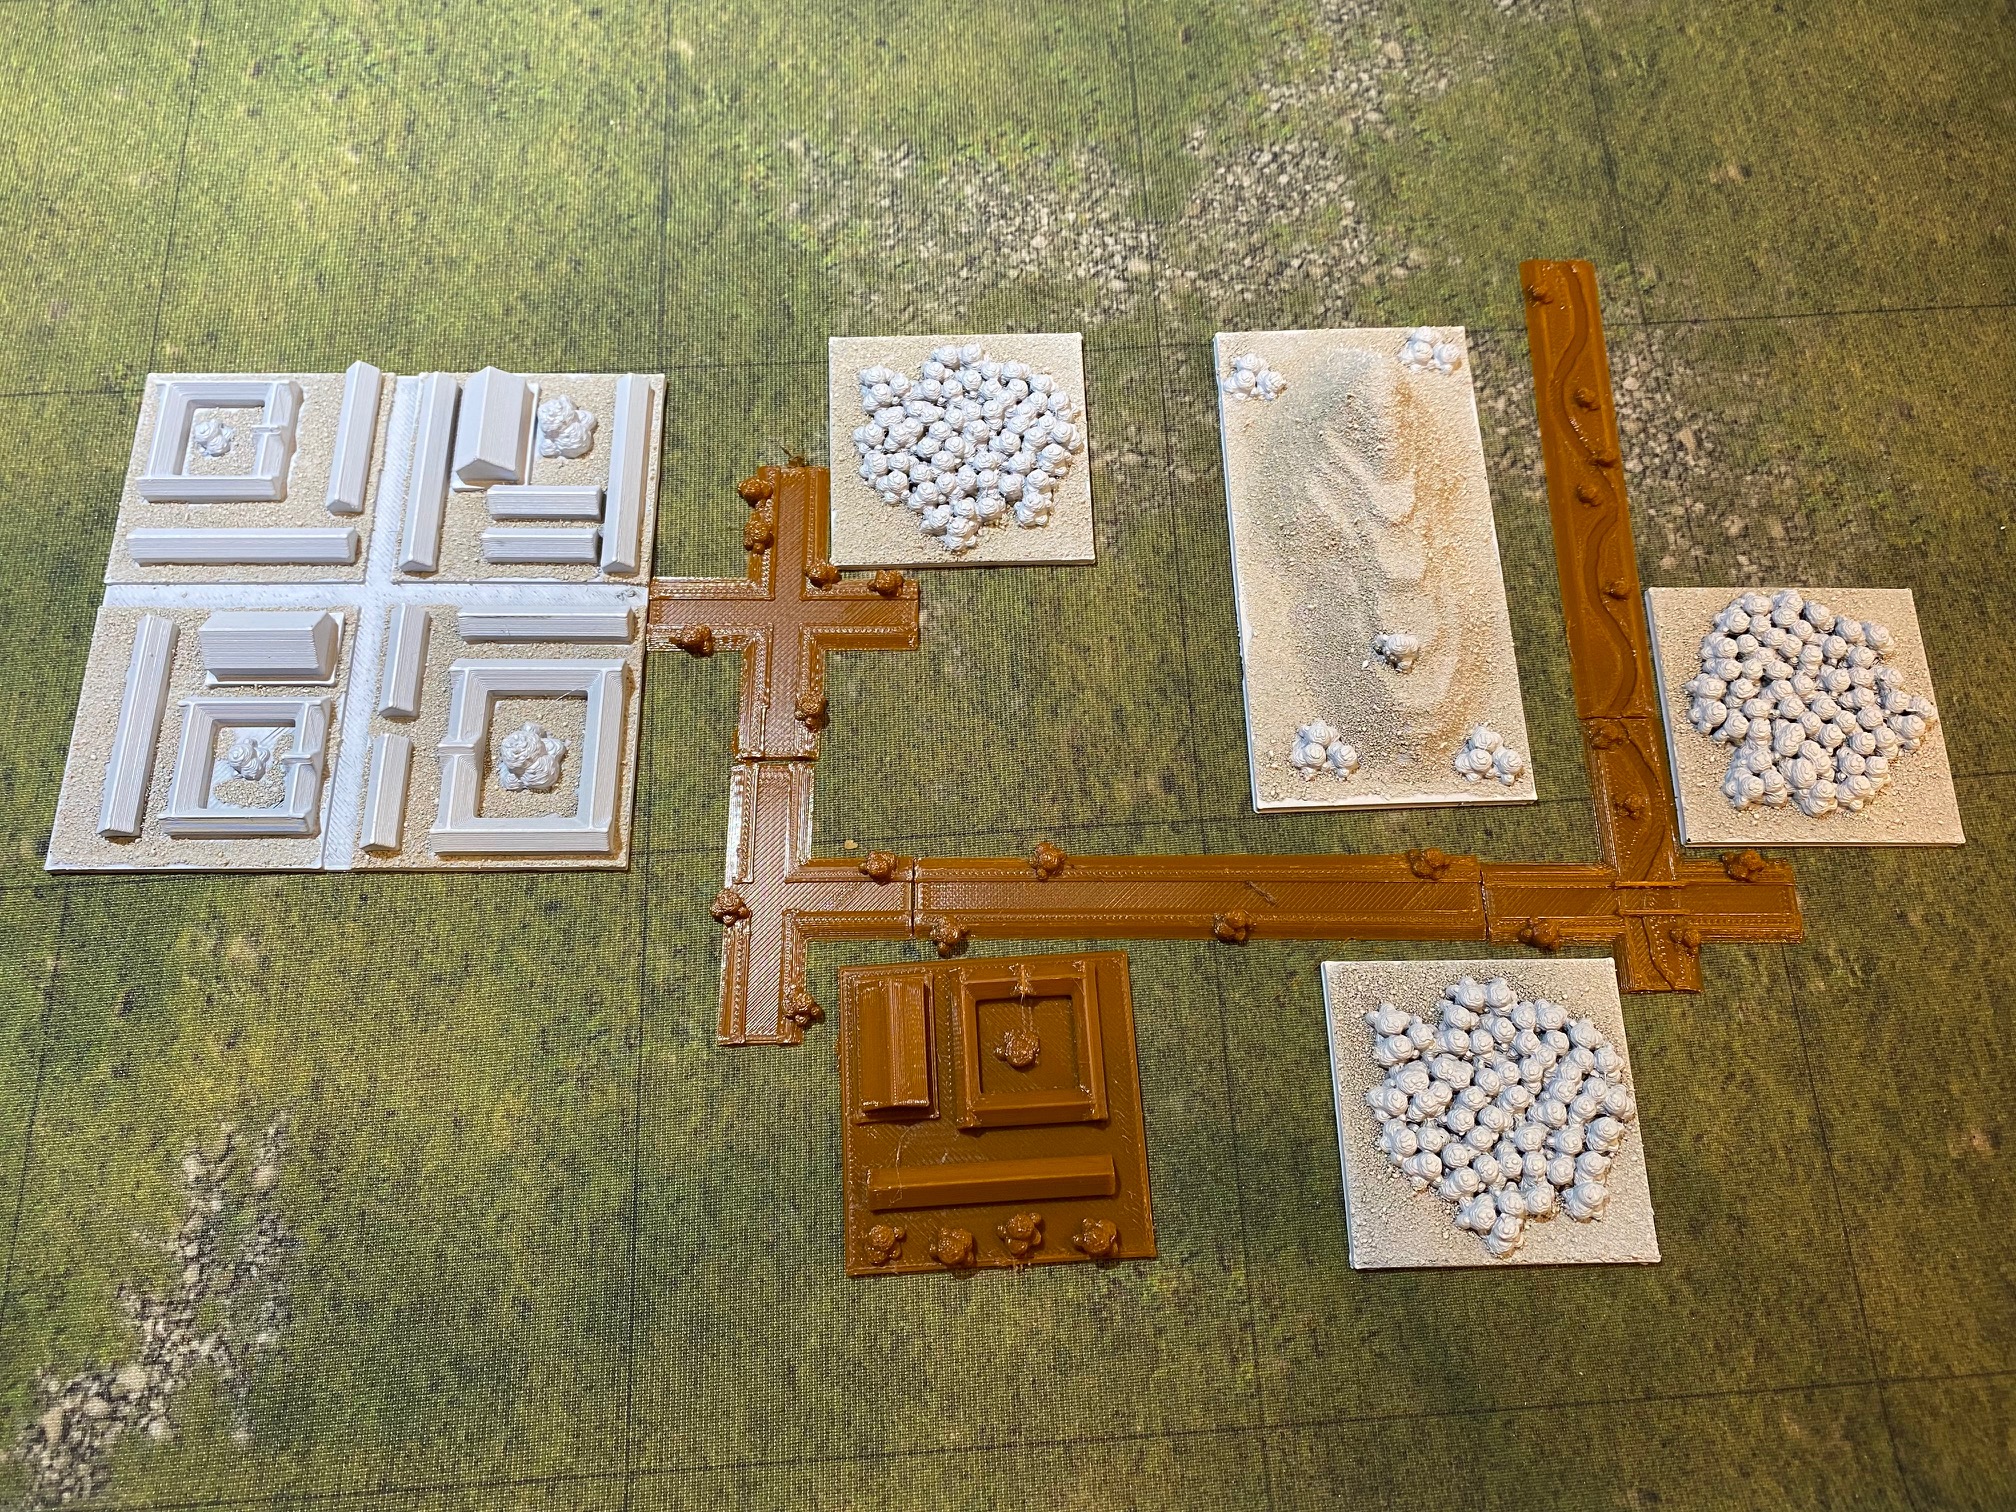
 Fueled with excitement for the new S&H rules I got to work designing some terrain pieces to suit my 50x50mm square battlefield.


These are simple items built using a combination of standard shapes (Cones, cubes, pyramids etc.) and other designs to be found on Thingiverse (trees, bushes, rocks, hills etc.)


Having drawn them up and converted them to .stls I printed them out before adding sand with PVA glue to the open areas.


Once dry I spray primed them in matt white before painting them up with a mix of Citadel Contrast and Scale 75 Instant Paints.


Finally when dry they were sprayed with matt varnish to protect and seal them.

The designs can be found on Thingiverse at https://www.thingiverse.com/thing:5355782 please feel free to give them a try😀


Strength & Honour - 2mm Ancients (4)

 I decided to take a pause and take a look at the approach I originally planned.

I’ve a perfectly good Deep Cut Studio gaming mat that’s marked out in 100mm squares, so taking the point Mark Backhouse made about imagining each “big” square is actually 4 ”small” squares (in this case 50x50mm) I have decided to produce my armies on 80mm wide bases rather than the 120mm wide bases I’d originally planned.

First up is my "Barbarian" army - produced using the technique I described in my last post. The base camp was designed using 3D Builder.


Next up is my Roman Army.


What other set of rules could enable you to produce two complete armies for next to no outlay and only take a couple of evenings to paint?😂😂

My next mission is to produce some more terrain (I’ve designed some roads, rivers and a villa to go with what I’ve done so far).

I’m now excitedly watching the “how to” videos and awaiting the rule release at the end of the month😃

Wednesday, 23 March 2022

Strength & Honour - 2mm Ancients (3)

 I've tried as hard as my somewhat underpowered laptop will allow me, to create some 3D printable warband "mobs" for S&H, but have failed dismally.

I found I could create a random shape in Tinkercad that I could then convert to a "Cookie Cutter" in 3D Builder and tried to use it on a very large body of figures I created by combining the infantry blocks available on Thingiverse from Braedzero.

This proved to be a job too far and my laptop just came to a halt!!

What was I to do?

Brainwave time (well I think it was😁)

Instead of using my random shape to create a "Cookie Cutter", I simply added it to a 80x45mm base in 3D printer (base was 2mm deep and random shape stood 2mm proud of the base)

Printed this out and then, using PVA glue, added some Woodland Scenics - Fine Dark Brown Ballast.

This is made from quite uniform particles which give the impression of thousands of heads.

Having tried this out, it occured to me that if I left this step to the very end, I wouldn't need to paint the tops of the figure blocks, saving me time. I will simply add sand to the base edges, prime in white and spray the ground colours. Then I will pick out the random shape in Vallejo black or Dark Brown and finally glue on the ballast .... hopefully job done.

I'll let you know how I get on.

If successful, that will be my Gaulish army sorted.

Thursday, 17 March 2022

Strength & Honour - 2mm Ancients (2)

As described in yesterday's post, I knocked up a basic Roman Legion base in 3d Builder. This had the overall dimension of  120x80mm by 2mm deep and used the medium sized infantry strips from Braedzero's Thingiverse files to build up the 10 infantry blocks.

This was printed on my Creality Ender 5 Pro using a 0.4mm nozzle and took just short of 5 hours to complete. I've ordered a 0.2mm nozzle to try to see what difference this will make to the resolution. The downside being it will take even longer still to print.

As ever, given that this was an FDM print, there was a certain amount of "stringing" at this scale. To overcome the worse of this I use a disposable cigarette lighter flame. I just pass the print quickly over the flame and the bulk of any "stringing" will vanish.


Once this was done I applied a coat of PVA around the infantry blocks and scattered some fine sand to texture the base.

When dry, I sprayed the entire base with Wilko's Matt White primer.

This gives a great basecoat for the next stage, painting using Citadel Contrast/Scale 75 Instants paints. The base was coated using Scale 75 Ogre Brown, which is actually a yellowy/brown that I think makes for a good mediterranean ground colour. 

When this was dry I painted each infantry block in Citadel Contrast Black Templar. This soaks into the recesses between the "heads" of the infantry and forms a nice shadow between the figures.

Finally, to finish them off, the infantry blocks were dry brushed with Vallejo Gunmetal before the individual shields were picked out by dabs of Citadel Blood Angels Red.

I then deliberated whether to add flock or not to the bases. The shortest flock I had was 2mm long, so in effect would have been 6 foot tall grass on the base! I therefore decided just to add some blotches of Scale 75 Instants Corrupted Stamina Green to give the impression of some greenery.

The base was finished with a quick squirt of Matt Varnish.

I'm quite pleased with this as a starter for 10. I'd intended using my Irregular Miniatures figures on MDF bases (and probably still will at some point) but this method will allow me to produce army bases reasonably quickly for very little outlay. Hoping to have two forces ready for when the rules finally launch in April.

The other files on Braedzero's pages cover things like Wagons, Chariots, Pikemen and Elephants so the world is your oyster. I've already knocked up Auxilliary Cohorts and Cavalry bases (based on the Roman Army on Jim's Wargames Workbench.) so just have to get them printed out to complete this army.

Better get that printer fired up........