E-Mail:

If you enjoyed visiting this blog, please leave a comment or feel free to contact me by e-mail: timstanks@icloud.com

Search This Blog

Wednesday, 2 July 2025

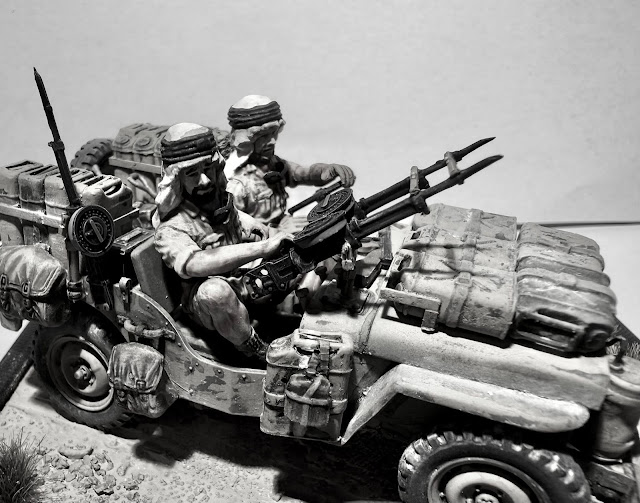
Tamiya 1/35 SAS Jeep

 When I bought my Matchbox Monty's Caravan at the IPMS Show in Gloucester recently, I also treated myself to the Tamiya 1/35 SAS Jeep kit from the same seller.


This vintage kit was only £5 and I couldn't resist it. Originally released in 1974, I've actually assembled this kit twice before......but I wouldn't dare share the pictures with you! Once when it first came out and I was 12, the next time was probably from my mid to late 20's, which looked a little better.

I clearly remember the review in Military modelling highlighting some of the model's deficiencies....

  • Lack of hose from radiator condenser
  • No German pattern Jerrycans
  • Jerrycans only having two handles instead of three
  • Rolled cam net lack of detail
  • Sand channels moulded together
  • Wrong model of Browning MG (they include a .50" where I think the real vehicles mounted .303" ex-aircraft guns)
More recently, the two man crew figures have received criticism when compared to modern offerings.

I was determined to try and build this to the best of my ability, but without having to spend a fortune on after market add-ons. So to help, I bought myself a mixed thickness pack of Slaters micro strip and set about seeing what I could achieve.


Like all Tamiya kits, the parts go together like a dream. I assembled the jeep body & chassis and gave it an undercoat of Light Stone followed by some dark brown "Pre-shading". I then gave it a coat of Olive Green - my theory was that they would be delivered in this colour and it would show through any chips to a top-coat of Light Stone. Unfortunately I forgot to photograph this stage!


I sprayed the 6 wheels in a dark rubber grey and then sprayed the hubs in Light Stone using a stencil.


When dry I gave it a coat of chipping fluid - I'm still working on the best dilution for this for spraying. I think around 50/50% fluid/water (or thinner) - and once dry, followed with another coat of Light Stone.


Then careful application of water, a stiff brush & cocktail stick gave me the well worn effect I was after.

While that all dried I started cleaning up & assembling the cargo and weapons  for the vehicle. 


Every jerrycan needed a lot of work. The seams had to be sanded smooth and a central handle added after the outer two were thinned down. I guess for completeness I should have done something to the fuel caps to up the detail there, but didn't think about it at the time.


Once they were all dry I grouped them together and, using microstrip, constructed frames to hold them together in the vehicle. the half dozen or so famous wartime photographs of these jeeps widely available on line give you plenty of inspiration. 


I also took a look at the rolled cam nets. These had a criss-cross pattern moulded in that wasn't at all convincing. To mask this I first tried multiple coats of Mr Surfacer 1500. This helped but was a slow process. Next I tried liquid Greenstuff, but this was no quicker. Finally I coated them using Vallejo Grey Pumice (a basing texture) which worked a treat!


The hose question was easily answered using a short piece of brass rod. The condenser was heated with a flame to distort it slightly to mimic the ones seen in the photos.


I painted all the stores (Ammo boxes, ration crates, small arms, shovel etc.) separately and then test fitted them in the jeep. Once I'd picked out the jeep hull details (dashboard etc) I glued them all in place.


The vehicle was no finished. All I had to do was add the figures, weapons & wheels.


I think the figures aren't too bad. The poses are quite natural compared to many Tamiya figures of the time, and well proportioned. Ok the details is a little soft, but nothing that a good paint job can compensate for. 


Firstly, they need assembling. This needs some care to ensure the hands match up with the steering wheel and Vickers K guns (I'd opted for these as they are historically accurate unlike the 50 cal.). Then they need some extensive cleaning up to remove the mould seams and fill the gaps. 


Once done, they were painted mostly using Citadel Contrast paints or similar.


Before final assembly, everything was given a coat of ultra-matt varnish to seal and blend everything together. The base was 3D Printed to match. The surface area was artists medium with scattered sand, followed by sprayed coast of various sandy shades. Some grass tufts just finishing things off.

I'm very pleased with this one. Its an old kit with it's limitations but still builds into a lovely little replica. I'll let the photographs of the finished model do the talking...


Friday, 20 June 2025

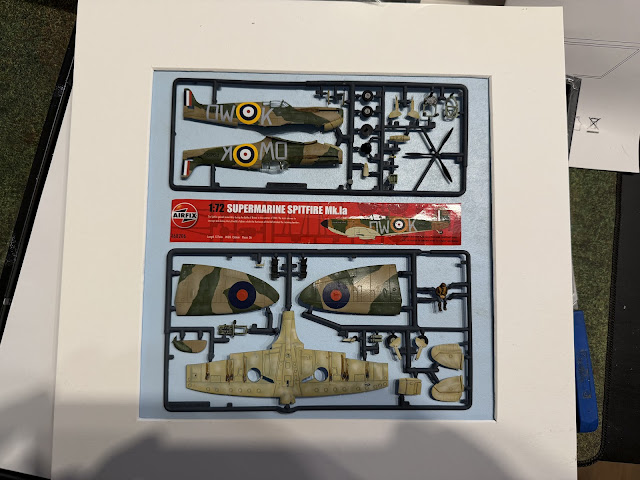
Airfix 1/72 Spitfire Mk1a - Framed Sprue

 I actually created this a few month ago, but forgot to do a write up (there's a few others I've found on my phone, too) at the time.


I bought this model at the IPMS Gloucester show in 2024 and it was waiting on my pile of shame to be tackled. It only cost me £5 and I'd always intended to frame the unassembled sprues as a complementary display to my Airfix Sherman.


This time I took a simpler approach and left out the paints, brush etc and reduced the amount of box art I included so the entire display would fit within the IKEA frame's mounting card.

To best suit the display I had to make a couple of modifications to the sprues.


1. The small clear sprue with the moulding of the canopy was discarded and the canopy carefully cut down the centre into two halves. Each half was then attached the to appropriate fuselage half with PVA after painting.

2. The pilot figure would have been facing to the rear, so I removed him from the sprue and reattached him facing forwards so his painted details would be seen on the display.

3. Similarly, the control panel/dashboard (was reversed so the nicely detailed decal could be applied and seen.


Firstly, I primed the entire sprue with a grey car primer rattle can. Then, to speed up painting, I masked most of the grey sprue and sprayed the underside light stone and the upper side in earth brown. These paints were modulated using pre-shading (dark grey) and highlighting using the base colour + off-white.


I then used my newly acquired AK Masking Putty to create the camouflage pattern on the upper surface spraying olive green.


The smaller details were brush painted, before I sprayed gloss varnish in the areas where the decals were to go. These were applied with the help of a setting agent to get them to conform to the panel lines. I then touched up the sprue in light grey and the model was complete. Lastly I added some weathering (Smoke marks mainly) and gave everything a coat of ultra matt varnish.


The back board of the frame wash painted sky blue with a Dulux match pot and the sprues attached with fuse wire.


Framed up, it looks good on my office wall and is  great conversation piece. Easy to achieve and very satisfying when it's done!


Thursday, 19 June 2025

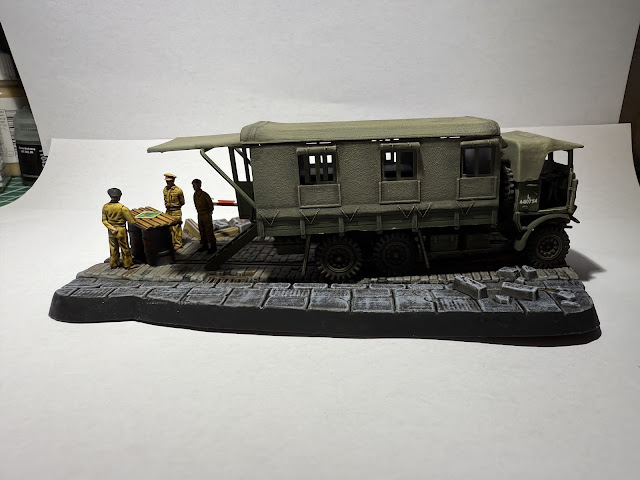
Matchbox 1/76 Monty's Caravan & Dingo Scout Car

Whilst we're talking nostalgia! At the Gloucester IPMS show a couple of months ago I bought a couple of classic kits second hand 😊


The first was an original Matchbox packaged Monty's caravan - on three different coloured sprues with a diorama base to display the finished model - £5! The second was the classic Tamiya SAS Jeep also for £5!


I failed to photograph the build but I have to say it wasn't too bad. The instructions suffer a little from trying to cram too much into each image. Often the position of parts that go on the far side of the vehicle were unclear. There were also a couple of obvious errors.


However for a kit that dates back to 1980ish it was pretty good.


The Dingo is a beautiful little model. A little fiddly to assemble, but a great scale rendition of this popular vehicle.


The diorama base represents a street seen in a German(?) city and has detail of tram lines and a destroyed statue. There is Monty, 2 staff members and a map table made from a piece of Wriggly tin and two oil drums.


Monty was the only casualty - he was missing his right (pointing) arm and I had to make a replacement.


Altogether a nice little model, one I never built when I was younger. It's crying out for an interior too. The inside of the caravan has the dividing wall to Monty's bathroom with wood panel detail and a moulded in map table.


Nice!


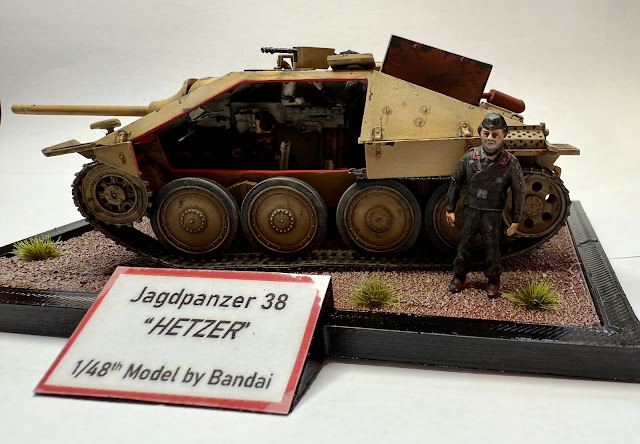
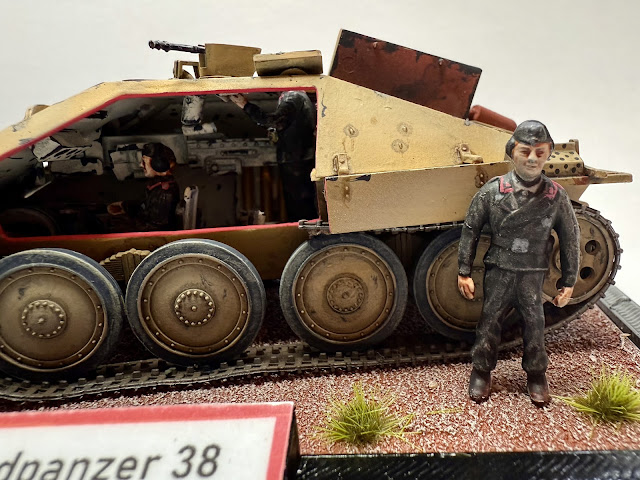
Bandai 1/48 Jagdpanzer 38 HETZER

 A bit of nostalgia for you here in the guise of a 1970's kit from Bandai's 1/48th range of AFVs.


I remember this range being launched and reviewed in Military Modelling with some interest as every model had a basic interior and figures include.


In fact, I can remember building both a Panzer II and M3 Half track, but have no idea what became of the models....

This particular model was kindly gifted to me by a Tank Club member who had it languishing on his shelf of shame for many years.


After wondering if this would lend itself to the sectional approach, I finally decided to build it as a cutaway.


 This was largely due to the inaccuracy of the firewall which would take too long to correct, but would be largely out of view in a cutaway model.


The model went together really well. I was able to neatly cut the hull side away with my circular saw attachment on my Dremel. 


I did add a couple of internal details just to boost the impression of what the vehicle would look like. I added a gunner's seat, sight, remote machine gun handlebars and some stowed rounds as well as two stowed rifles on the firewall.


The crew figures are basic and required a good deal of cleaning up, but are better than nothing. Two fitted into the interior and the third I placed outside.


I painted the interior before assembling the hull upper and lower and then practiced my "modulated" finish on the exterior.


I pre-shaded with Dark brown before lightly over-spraying Mid-Stone. Finally I picked out the centres of each panel with lightened Mid Stone until I have the look how I wanted it.


I then added the few decals (the originals from the kit!) and weathered it with earth wash and powders. I added some dark grey "chips" with a fine paint brush before mounting the finished model and a custom 3D printed base.


Very satisfying, and great fun to re-visit a kit that was the best part of 50 years old and years ahead of it's time.