E-Mail:

If you enjoyed visiting this blog, please leave a comment or feel free to contact me by e-mail: timstanks@icloud.com

Search This Blog

Showing posts with label PSC. Show all posts

Monday, 22 June 2020

Battlegroup Northag AFVs


Having now finally got myself modern armies in both 6mm and 15mm scale, Plastic Soldier Company conspire to rain on my parade with their adoption of 12mm for their new Battlegroup Northag range!

I’m a bit of a sucker for 10-12mm scale so whilst I’m doing my best to resist this new direction, I cannot help but be interested to see what these new models will look like.

Online reviews of pre-production sets look promising. They are using the new ultracast technology (isn’t everyone?) so they are made from a slightly flexible material that appears to take paint without the need for primer?

1/144th compared to their 15mm big brothers
But what would they feel like in your hands and look like on the table?


Well I couldn't stop myself from printing some vehicles up at 1/144th scale just to see! I chose some models designed by "Captain Ahab" available free from Thingiverse (https://www.thingiverse.com/captain_ahab_62/collections) which are designed to print at 1/300th but created at 1/100th scale.


The pictures should tell all. They look great at this scale and would enable larger games to comfortably be played on smaller tables. 

I must remain strong and resist.......

Thursday, 2 May 2019

PSC The Great War - French Army Expansion

I signed up to the French Expansion Kickstarter way back when finally receiving the finished article in September 2018 (see http://timstanks.blogspot.com/2018/09/pscs-great-war-french-army-expansion.html).


I commented on my initial thoughts then, so won't repeat myself. This is just an overview of what I have done to finish the figures off ready to play.


I decided that I would mount the figures four to a 40x30mm mdf base as I had done previously with both the British & German armies. To indicate how many lives each group of four had remaining, I added a Minibits dice frame and micro-dice.

My thinking here was that the figures could be used with other rule sets as wargame units with the dice left off the bases.


The new "Special Troop" figures (Sniper, Flamethrower etc.) I based on a 20mm dia. mdf circular base


I purchased the bases at Colours 2018 and didn't really do my homework first..... I therefore bought larger Micro-dice/Frames than I'd used previously (though they're easier to see!) and I'd previously based the  Grenadier figures from the original game on 15mm dia. bases not 20mm.


Oh well....


The figures are now moulded in  a blue flexible plastic and I first washed them in detergent to remove any grease etc. before painting commenced.


As flexible figures invariably shed flaking paint over time, I decided to use the moulded colour as my "Base Coat" to minimise the risk. To add depth, however, I decided to give them an overall  wash of a darker colour.


So the first job after gluing them onto lolly sticks ready to paint, was to give every figure an overall coat of Army Painter blue wash. Sadly my detergent wash failed to remove all the release agent and the wash did not cover well.


A second wash gave the same result, so in desperation I washed them all in Mentholated Spirit which finally did the trick.

So all figures received an overall blue wash.  Once dry I painted the details; -

  • Boots, Webbing straps, Rifle Wood work and Rucksacks - Leather Brown
  • Haversack, Rolled Shelter, Gasmask - German Camo Beige
  • Gasmask Filter, mess tins and Gas Mask case - Dark Grey
  • Hands and face - Flesh
  • Rifle receiver and details - black
  • Bayonet Blade - Boltgun Metal
Then all these above areas received a coat of sepia wash.


The bases were given an overall coat of camouflage green (tool two coats to cover burnt edges of mdf bases) and once everything was dry I added some railway scatter to break up the surface.


Finally one spray coat of Satin Varnish followed by Army Painter Matt Coat when dry.


This was a quick and dirty method of getting these figures ready for action and works very well.


To go with this expansion, PSC have added French Tanks as options. The rules for their use came with the expansion as stretch targets, but the vehicles had to be purchased separately.


As luck had it, Firestorm Games were selling off their Battlefront Great War range and I picked up two C1. Schneider tanks at 50% off. Then at Crusader 2018 I picked up another Battlefront Schneider together with a St. Chamond for £5 and finally I rediscovered two Peter Laing FT17's I've had for many years.


All these were given a rather garish paint scheme (as per the Battlefront Great War rule supplement) so they can be fielded as part of my new French Army.


And very nice they look too. All I need now is some free time to try them out......


Monday, 19 November 2018

PSC's The Great War - The French Army Expansion - figure painting

Just a quick post to prove I'm still alive.

Family holiday + another work trip abroad have limited my blogging time these past two weeks.

However I've done some modelling and finally got around to playing a game with my TravelBattle set - more of which in  a future blog.

One of the challenges I've been facing myself with these last few weeks, is how to tackle the new softer plastic French army figures I'd just received from PSC.

Two problems came to mind; -

  1. There's loads of them!
  2. Soft plastic and acrylic paints .... will the paint flake off.
These days I tend to look for a suitable spray paint to base coat my figures to try and speed things up. But I couldn't find a suitable blue anywhere. Even if I could....would the paint stick?

Then I had a light bulb moment!!

"What if I just left them the colour they came in and just painted the details? Better still what if i coated them in a blue wash first to pick out the detail and then painted everything else?"

To test my theory, I picked a figure up and tried to coat it in blue wash (Army Painter).... epic fail 😣 the wash just pooled due to the release agent coating the figure.

I should have known better! So I gave the figure a light scrub in some detergent solution, dried it and tried once again. Success 😁

Once it was dry I painted the details (flesh, weapon, webbing, boots etc) and then in turn, washed them with sepia wash.

Result was a very quickly finished figure that looks just fine, And it appears to hold the paint well too. When I base them I'll spray them with varnish so I think they will be just fine.


Sunday, 9 September 2018

PSC's The Great War - The French Army Expansion

Finally it has arrived. PSC are really making a name for themselves with late delivery (originally due for delivery in June 2018) on Kickstarter projects!

Having so far bought the original game (on Kickstarter) and the first expansion - Tanks (again on Kickstarter) I felt obliged to back the latest offering too.
I must say the production values are well up to the standard of the previous too, though, if I'm honest, without the attractive stretch target additions, I'm not sure it's particularly good value for money at £45?
In the attractive box was one 15mm French army pre-cut from the sprues, in a new softer compound plastic. In total there should be 48 infantry, 3 MG teams, 3 Mortar teams, 3 Grenadiers  and a further 14 "Special troops" - a new feature for the rules. In fact I had 68 infantry figures so cannot moan...
French Special troop Types including Flame Thrower, Officers, NCO's, Chauchat Gunners, Engineer etc.
In addition there were 18 "Special Troop" figures to add to each of my existing British & German armies from the original game.
The rule book only covers the St. Chamond & Schneider tanks - not the Ft17
The rule book includes new rules for French troops, their tanks (which, whilst offered as part of the Kickstarter, I didn't purchase as I already have some perfectly good Battlefront examples) and how to use the new Special Troop types in games. Also there were 20 or so new scenarios which include several for the fighting around Verdun.
British Special Troop Types - Officers, NCO's, Lewis Gunners etc.
Two quick reference sheets were included as well covering the new troop types & new terrain hexes.
Quick Reference Sheets
 Finally there were three sheets of (high quality) card terrain hexes to add to those I already have from the first two boxed sets.
Terrain Hexes & Counters
The stretch goals rewards were decals for tank nicknames, an additional set of battle dice, more scenarios (on a loose sheet) a Rather small tank data card & French victory tokens (in card).
Kickstarter Stretch Goals
But best of all were two complete "replacement" armies in the new plastic (already cut from the sprues) including the 18 "Special Troop" figures for each army - British & German - these will retail post-kickstarter for £19.50.
My extra British Army 
This I think was brought about by the unhappiness that dyed in the wool board-gamers felt having to cut the original (hard plastic) figures from their moulding sprues!
The MG's are now single piece mouldings
Whilst I admit, it was a challenge not to damage the British infantry's bayonets whilst doing this, it wasn't all bad. I'm more than happy with my original figures so I don't really need these for the game itself.
Additional German Army
 So I'm currently unsure what to do with these - I guess they could make a good start towards a couple of Square Bashing armies?
Sorted ready for painting etc.

Thursday, 7 September 2017

Painting Tutorial 15mm German Late War Infantry

As a diversion from my Zulu Wars 28mm figures I decided to paint up a few Plastic Soldier Company Late War German Infantry figures.

I’ve had this box of figures for a couple of years now and every so often paint a few up. I think for pioneering sculpts of 15mm hard plastic figures they’re not too bad at all and represent fantastic value for money as you get something like a 1:1 Company in a box for around £20.

In case it’s of interest, I’ve split the process into stages to show you how I go about the painting and basing process.

Step 1: Priming. After cleaning the figures up and assembling them where required, I cover the base with bird cage sand stuck with PVA.  I then stick them to a lolly stick with PVA and let them dry. Then I spray them with white primer. For many years I’d only use GW Primer. Then I was converted to Army Painter products and then recently I discovered Wilko’s own Matt White Primer …an absolute bargain at £3.75 a can!


Step 2: Using slightly watered down Vallejo Field Grey acrylic I give the whole figure an all over coat. This is down quickly, but ensuring no uniform parts (or field caps) are missed.


Step 3: when this is thoroughly dry I give the Field Grey a coat of Army Painter Green Wash and leave once again, to dry. This settles in the folds and creases and gives the figure instant “Depth”.


Step 4: Next I paint the base with cheap craft acrylic paint by Anita (the shade is called Coffee). When dry I give this a Vallejo Sepia Wash. While this dries I painted the helmet cover in Vallejo Desert Yellow and added splodges of acrylic grass green and red brown. Finally once the base was dry I painted the boots in German Camouflage Black Brown.


Step 5: On the rear of the figure I block painted in the bread bag in Light Grey, the gas mask container & mess-tin in Panzer Grey and the poncho the same colours as the helmet cover.


Step 6: Next the Rifle was painted in Vallejo Matt Black as were the belt and Y straps. When dry the woodwork and entrenching tool handle (plus any stick grenade handles) were painted in Vallejo Leather Brown Game Colour. When dry the hands and face were painted in Vallejo Flesh which in turn was washed with Vallejo Flesh Wash.


Step 7: From the rear you can see the securing straps on the equipment have all been picked out in matt black as has the strap around his helmet. The mess tin, gas mask container and metalwork on the rifle all have a light dry-brushing of silver at this point.


Step 8: Now the painting is complete, the figures were based in groups of 3 on 30x30mm laser cut mdf bases, I use this basing convention as it fits in with all the major rule sets I'm likely to use - Crossfire, PBI, BKC, IABSM etc. They are glued in place with superglue and then the base covered in sand stuck down with PVA. When the sand has dried the base was given a coat of Anita's Coffee coloured paint. Then coat of Vallejo Sepia Wash and finally a dry-brush of Vallejo Buff.


Steps 9: The final finishing. I spray coat the bases with Army Painter Satin Varnish followed by Army Painter Anti-Shine Varnish to protect the figures. Then when dry I apply patches of static grass with PVA and the bases are finished. I tend to paint figures in batches of 15-20 at a time to avoid getting too bored painting the little details on figure after figure. Below are the finished items.


Hope you found this helpful.


Sunday, 1 November 2015

PSC The Great War - Trial Solo Game

Having finally finished painting all the figures from the basic game + the guns and Generals from the Kickstarter package it was time to start to learn the game mechanisms.
I thought I'd start with the first scenario at the back of the rule book. Laying out the way German trenches first, I experienced the frustration I've read about when trying to locate trench junction hexes. Because the hexes are printed on both sides, you've got to keep turning them over to find what you want. Careful storage will solve this one, keep all the junctions together.
Having laid out both front lines, I deployed the units as recommended in the scenario.
Next I dealt five command cards a piece and two combat cards. Each side started with six HQ tokens as well.
The British command cards presented them with three cards to order the left hand section of the board, one for the centre and one that allowed units to be ordered in the left and right sections.
I thought I'd get straight into it to see what the mechanism should do. I advanced out of the trench one hex and tried a ranged attack at maximum range. A single dice role, but I got a burst symbol - one hit!
Next move the Germans got their opportunity to pay me back. Two hits and a retreat one hex. Back where I started and two lives down. Well ranged combat is simple enough!
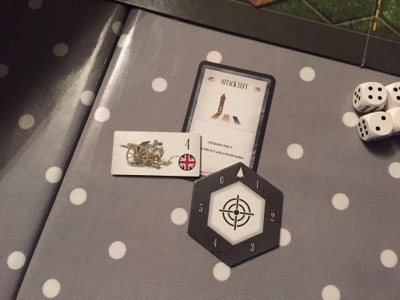
Next let's try ranged attacks by the reserve artillery. They need to be ordered to do so, just like the infantry units. Both sides had strength 4 artillery, meaning they roll four D6 to find out what they've hit.
Artillery template placed on target hex with the 6 facing their base edge. Four dice rolled.
The barrage landed in hexes 2, 4 & 5. The double four means one barrage landed on target. This was rolled first and gave me an HQ token. The others had no effect as no one was in the hexes.
The German barrage next move was equally ineffective.
Time to try the close combat mechanisms. An order four random units and add an extra dice to their combat phase command card allowed me to advance to contact in two places. The combat dice were rolled and the reductions for being in a trench were applied. Both combats resulted in the enemy units taking two hits -a good start.
The following turn, the Germans were unable to order a counter attack, so once it was my turn once more the British capitalised on the situation, caused two more hits on one unit -destroying it. The British unit could now follow up and occupy the hex and take a victory medal counter.

All in all quite easy to learn......difficult to master! I think you need to build up the pressure (artillery, mg and mortar fire) before you can launch a breakthrough attack. More practice definitely needed, but a good start. I think I'm going to like the Great War.