E-Mail:

If you enjoyed visiting this blog, please feel free add a comment after the article in question :-)

Search This Blog

Showing posts with label Warlord. Show all posts

Friday, 11 April 2025

Warlord Games 1/56 Jagdtiger

 Next from my ever growing stash of 1/56th scale AFVs I chose to build the Jagdtiger from Warlord Games/Italeri.

Moulded in the usual grey polystyrene, this is a very simple kit that would pose no problems for any level of modeller.

The running gear come complete which greatly reduces the time taken to assemble the kit, at th cost of some loss of detail to the wheels. The tracks come in four pieces that wrap around the running gear, which allows them to be painted off the model. I'd already decided I was going to represent a vehicle in an "Ambush" camouflage scheme, so sprayed some of the wheels in red brown and olive green.

I'm learning and trying out new techniques all the time. To enhance the rolled armour plate and the cast mantelt, I applied Mr Surfacer 500 and stippled the surface with a stiff brush as it dried. All this was applied over a coat of white primer. I opted to assemble the model in stages and paint each before final assembly, which worked quite well.

I decided to have a try at pre-shading once again and sprayed earth brown on the areas where I wanted shadow to appear.

I then sprayed the base coat of dark yellow. I thinned the paint with Vallejo thinners and flow enhancer. This seems to have made the paint coat thin enough for the darker areas to show through. I then sprayed lightened adrk yellow (just a few drops of white added) to spray the centre of every panel and any raised areas. This gave a good finish with some nice variety of shading - I think the term is colour modulation?

I proceeded with spraying the red brown and olive green camouflage patches.

And then applied the same process to these. Spraying a slightly lightened colour in the centre of each patch.


Finally, I added the dabble effect over the base coat using AK Paint pens. These are awesome, and made this job quick and easy.

All that was left to do was assemble the sub-assemblies and then weathering could take place.

I gloss varnished the points where decals were to go and then applied them using setting & fixing agents.

Then all the tools and other gear were painted  along with the crew figure.

I kept weathering subdued as I was quite happy with the effect of my "Colour Modulation" work. I just applied a pin wash using Vallejo dark brown wash. Followed by a very light dry brush of Iraqi sand to pick out the raised edges. Finally I dry brushed some very dark brown to simulate chips and scuffs here and there, and it was finished.

An excellent kit, easy to assemble, sufficient detail and fun to paint.


Monday, 24 February 2020

Citadel Contrast Paints - Afrika Korps 28mm

I've seen on line that a few painters have been experimenting with using Contrast Paints for Twentieth Century Historical subjects and I thought I'd give it a go too.

I chose to try and paint up a 28mm Warlord Games plastic Afrika Korps figure from the free sprue that came with Wargames Illustrated some time last year.

I also have a spare box of Blitzkrieg era German Infantry and it occurred to me that with a bit of careful painting and mixing and matching between the sprues I could put together an Afrika Korps force to face my Perry 8th Army Figures that I'd painted some time ago!(http://timstanks.blogspot.com/2013/05/28mm-perry-8th-army.html)

Most important of all I felt that Contrast Paints presented an opportunity to get these figures finished to a good wargame's standard very rapidly.


Step one, after assembling the figure, I mounted it on a 25mm Steel washer using super-glue. This gives the figure a similar weight to a metal equivalent and means they can be stored on magnetised sheet in a Really Useful Box. I cover the underside of the hole with a little bit of tape before texturing the base with Vallejo Grey Pumice. The tape is removed once the pumice has set. Then the figure is ready to spray with Wilko's Matt White Primer. Don't worry about using GW's recommended primers, there is no need, this one works just as well.

The Snakebite Leather was in short supply when the paints were first released hence the hand-written label from GW!

Here are the Contrast Paints I used on this project. As contrast paints are closer in make-up to a dark wash than a paint, you will find that if you over-paint areas you cannot simply cover this up with the next colour as it will show through. Therefore take care to stick to the areas! I use an Army Painter Insane Detail brush and this seems to give me the control I need. However, if you do miss or drip paint where it's not needed all is not lost! Just paint it over with Vallejo Matt White, leave this to dry and then carry on....


The skin areas are painted in using Darkoath Flesh and the trousers, helmet, magazine pouches, water-bottle and poncho were all painted in Skeleton Horde.


The boots, weapon sling, and wooden handles on the grenades were painted Snakebite Leather.


Next the metal parts of the grenades, the mess-tin, water-bottle cup and weapon were all painted using Black Templar.


The tunic was painted in Militarum Green and the belt buckle and bread-bag were painted in Basilicanum Grey.

 Finally, the 'Y' straps, magazine, water-bottle, mess-tin and poncho straps were picked out in Cygor Brown (one of the few Contrast paints with actual covering power so can be applied over the base colour!). Then the neck scarf painted Creed Camo.


A coat of Skeleton Horde gives a good impression of a sand finish to the base. and there you have it....finished.

And what's more it took me less than 5 minutes to get to that point! To finish them off I will probably pick out the buckles and buttons with some light grey before I give the figure a coat of varnish and add a little static grass to the base.

I strongly urge those of you who have yet to try these paints to give them a go and experiment. To my mind they are one of the big hobby innovations of recent times and deserve wider use in the hobby.


Thursday, 20 December 2018

Warlord Games - 28mm Panzer IV Ausf G

I built all my 28mm AFV hoard together, as I planned to camouflage them using my airbrush.

Running gear, tracks and side skirts assembled & sprayed
I don't leave the airbrush set up when I'm not using it and, to be honest,  it's a bit of a pain to get it  out ready to use. So when I do use the airbrush I try and maximise it's use, spraying as many things as possible!

So you'll notice evidence of it's recent use in both past and future posts.

The first finished AFV I'll talk about was the Warlord Games  Panzer IV which can be built as an Aus F, G or H.

The model was moulded in grey polystyrene and pretty well flash free.

Hull and turret assembled and sprayed
Assembly is straight forward and also flexible enough to allow some parts to be painted on their sprues. To facilitate this I primed both sprues with matt white spray. before I started to assemble.

One departure I made from the assembly instructions was to leave off the running gear until later. I assembled these on the sprues (i.e. added the drive sprockets and rear idler) but left them attached for now to ease the spraying.

The track links (one top piece and one lower run of track) where also painted on the sprues. To do this I spray them Matt Grey and then a coat of Vallejo Flesh Wash (looks good as rust too!) followed finally with a dry brush of Silver on the raised edges.

Details brush painted in - tyres, tools & extinguisher and weathering begun
The hull and turret went together easily. I chose to leave the turret commander's hatch open and painted up the commander half-figure supplied with the kit. Whilst not their best ever sculpt, he was more than adequate for the purpose.

The crew half-figure supplied with the kit

The turret spaced armour needs care to attach correctly, but once on, and thoroughly dried, it is strong enough to cope with repeated handling.

Track units completed and touched up, ready to attach to the hull sides
I opted to omit the moulded radio aerial  as this will only get broken off during wargaming.

The side skirts were assembled off the model ready to attach as the very last job. These each had four strongly moulded brackets by which they will be hung from the tank's hull.
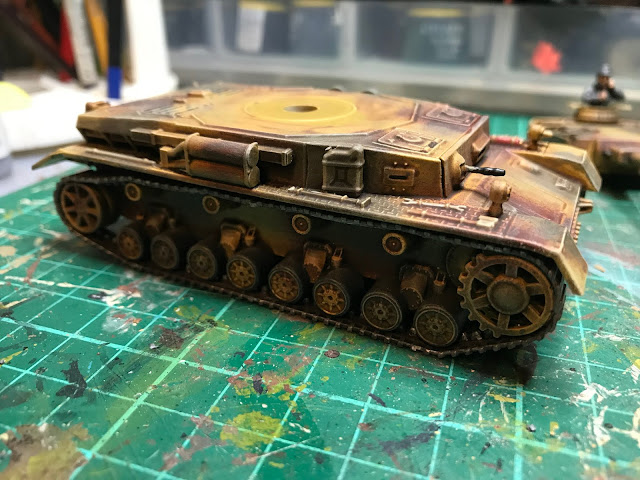
Track units attached and hull has been dry-brushed
Once all the main components (Turret, Hull, Track Units, Tracks and side skirts) were assembled I set about spraying. The base coat was German Dark Yellow - all the paints coming from Vallejo's Model Air range of colours - then the camouflage pattern was over-sprayed with German Tank Brown and finally German Tank Green.

Once thoroughly dry (my Loser Shed is a little cold at this time of year and paints take some time to harden so I left these overnight to be certain) I painted in the details like the tyres in dark grey, pioneer tools, extinguisher etc.

Turret completed together with commander figure supplied.
Then it was time to weather things a bit. I kept this simple by adding shadow/depth with some Vallejo Sepia Wash and highlights by dry brushing Iraqi Sand.

I assembled the track units off the vehicle, touched up the paint where needed and then attached them to the hull.

Finally I added the side skirts. These need a lot of care to ensure the brackets have all adhered strongly to the hull. My first attempt failed when I picked up the model squeezing the side skirts, and as I did they came away.

attaching the side skirts.....
Lastly, before spraying with matt varnish, I added a few decals. The set supplied gives plenty to choose from, but I stuck with a turret number, Balkan cross and divisional symbols.


A smashing little model when completed, quite robust as long as I'm careful with those side skirts.


I bought mine at Reveille II for just £16 which I think was a very good price. Build time is very quick, quicker still if you're going to brush paint it! You won't be disappointed.


Wednesday, 7 August 2013

Warlord 28mm Ruined Farmhouse

My dear wife bought me this for my birthday, and a very useful addition to my terrain collection it is.
There are sufficient parts to assemble a variety of ruins. I chose to create a ruined house (which I thought was reminiscent of my much loved Airfix Strongpoint from the 1970's) and a smaller ruined cottage or outbuilding.
I glued the finished ruins to sheets of 3mm Perspex I had lying around. And created the effect of tone flooring with some old vacuum formed sheet I found in my spares box.
You could always use the pieces in any way you wished. It would be possible to create a large farmhouse ruin or half a dozen small ruined corner walls to use as cover from fire.
If I have a complaint with the kit it's that the larger pieces are terribly warped. I tried straightening with hot water, but failed dismally and decided to accept that's the way it was going to be!
I covered the bases with PVA and sand and when dry, sprayed them in grey car primer.
I then painted them with black wash before I dry brushed light grey over the top.
I wasn't that impressed with the finish and I went back and dry brushed with a brown/light grey mix which gave a much warmer "Normandy" look. This was highlighted with dry brushed buff.
When dry I picked out remaining areas of plaster/render in white - weather around the edges with sepia wash.
Finally the base was painted brown and dry brushed buff before adding static grass. The slates were made from the one remaining corner piece I had left over. I spray varnished both buildings to protect them during handling.

I'm very pleased with the end result. At first they might seem expensive at £13.50 (if bought alone) or about £30 for three on some discount sites. But when compared to mdf equivalents (which would lack the detail we have here) they are pretty good value for what in effect has produced two ruined buildings.

As stated earlier, my only real gripe is the degree of warping. I can put up with this though, it is a ruin after all!