E-Mail:

If you enjoyed visiting this blog, please feel free add a comment after the article in question :-)

Search This Blog

Showing posts with label CoC. Show all posts

Wednesday, 25 March 2020

28mm Afrika Korps

Whilst I've stopped painting any more for the moment, here are the Afrika Korps miniatures I've painted so far for Bolt Action/CoC use.


They are a mixture of Warlord Afrika Korps figures (from the free WI sprue last year) and German Blitzkrieg Infantry.


There are a multitude of spare heads included on the AK sprue (Helmets, Caps & Sun Tropees) replacing the heads supplied with the Blitzkrieg Infantry with these and a suitable paint job, gives a very usable AK figure.


There are also several support weapons on the AK sprue (Anti-tank rifle, 50mm Mortar & MG34) but only one prone figure. Using these weapons with the appropriate arms on the the Blitzkrieg Infantry prone figure ensure these do not to go to waste.

All painted (very rapidly) using Citadel Contrast paints.

Monday, 24 February 2020

Citadel Contrast Paints - Afrika Korps 28mm

I've seen on line that a few painters have been experimenting with using Contrast Paints for Twentieth Century Historical subjects and I thought I'd give it a go too.

I chose to try and paint up a 28mm Warlord Games plastic Afrika Korps figure from the free sprue that came with Wargames Illustrated some time last year.

I also have a spare box of Blitzkrieg era German Infantry and it occurred to me that with a bit of careful painting and mixing and matching between the sprues I could put together an Afrika Korps force to face my Perry 8th Army Figures that I'd painted some time ago!(http://timstanks.blogspot.com/2013/05/28mm-perry-8th-army.html)

Most important of all I felt that Contrast Paints presented an opportunity to get these figures finished to a good wargame's standard very rapidly.


Step one, after assembling the figure, I mounted it on a 25mm Steel washer using super-glue. This gives the figure a similar weight to a metal equivalent and means they can be stored on magnetised sheet in a Really Useful Box. I cover the underside of the hole with a little bit of tape before texturing the base with Vallejo Grey Pumice. The tape is removed once the pumice has set. Then the figure is ready to spray with Wilko's Matt White Primer. Don't worry about using GW's recommended primers, there is no need, this one works just as well.

The Snakebite Leather was in short supply when the paints were first released hence the hand-written label from GW!

Here are the Contrast Paints I used on this project. As contrast paints are closer in make-up to a dark wash than a paint, you will find that if you over-paint areas you cannot simply cover this up with the next colour as it will show through. Therefore take care to stick to the areas! I use an Army Painter Insane Detail brush and this seems to give me the control I need. However, if you do miss or drip paint where it's not needed all is not lost! Just paint it over with Vallejo Matt White, leave this to dry and then carry on....


The skin areas are painted in using Darkoath Flesh and the trousers, helmet, magazine pouches, water-bottle and poncho were all painted in Skeleton Horde.


The boots, weapon sling, and wooden handles on the grenades were painted Snakebite Leather.


Next the metal parts of the grenades, the mess-tin, water-bottle cup and weapon were all painted using Black Templar.


The tunic was painted in Militarum Green and the belt buckle and bread-bag were painted in Basilicanum Grey.

 Finally, the 'Y' straps, magazine, water-bottle, mess-tin and poncho straps were picked out in Cygor Brown (one of the few Contrast paints with actual covering power so can be applied over the base colour!). Then the neck scarf painted Creed Camo.


A coat of Skeleton Horde gives a good impression of a sand finish to the base. and there you have it....finished.

And what's more it took me less than 5 minutes to get to that point! To finish them off I will probably pick out the buckles and buttons with some light grey before I give the figure a coat of varnish and add a little static grass to the base.

I strongly urge those of you who have yet to try these paints to give them a go and experiment. To my mind they are one of the big hobby innovations of recent times and deserve wider use in the hobby.


Wednesday, 29 May 2019

28mm British WW2 - Crusader Miniatures & 1st Corps Figures

I've been busy trying to finish off a late WW2 British/Commonwealth force for use in Bolt Action or CoC games.

Crusader Miniatures

The core of this army was a unit box of 24 Crusader figures purchased some years ago.

Crusader Miniatures

To these I added a 2" Mortar team, 3" Mortar Team and Vickers MMG Team from various other manufacturers.

Crusader Miniatures Vickers MG Team

I really love the Crusader figures. They are chunky and very accurately equipped (Late pattern respirator cases etc.) and a pleasure to paint.

Vintage Bolt Action Miniatures 3" Mortar and crew

When finished, I realised that I needed a few more figures to make them up to platoon strength. To do this I looked at all the 28mm manufacturers to see who was best value for the figures I wanted.

I needed:-

  • PIAT Team (2)
  • Bren Team (2)
  • Riflemen (6)
Most manufacturers pack their figures in such a way that I'd need to buy more than I needed. Then I found 1st Corps. They pack theirs in sensible numbers, the price is sensible and they look to be a good match. So I ordered a PIAT two man team (£3) + a section of ten including a Bren Gun team (£8).
1st Corps

They arrived very promptly and only need the minimum of cleaning up. Unfortunately the PIAT loader had a deformed face as part of the rubber mould had torn away and become lodged where his chin should be! This was largely hidden once based (the figure is prone) so I didn't worry too much.

1st Corps

To paint the figures I follow this process after basing on Renedra plastic bases and texturing with Vallejo Grey Pumice;-
  • Spray undercoat of PSC British Khaki Uniform
  • Paint all Webbing and anklets in Vallejo Middlestone
  • Paint respirator case in Vallejo US Green Uniform
  • Paint in hands and faces Vallejo Flesh, followed by Vallejo Flesh Wash
  • Paint weapon woodwork Vallejo Game Leather Brown
  • Pick out weapon metalwork, water bottle top, boots and underside of helmet rim with Vallejo Game Black
  • Pick out the buckles and butt plate in Gold to simulate brass.
  • Paint helmet surface with Vallejo US Olive Drab and pick out any scrim with Vallejo US Green Uniform
  • Apply Vallejo Sepia Wash to all uniform, helmet and wood surfaces
  • Finally dry brush whole figure and base with Vallejo Iraqi Sand
As ever I spray the finished figure with Satin Varnish first followed by Anti-Shine Matt varnish afterwards. Finally applying a little flock to the base with PVA glue.

1st Corps

I'm quite happy with the 1st Corps figure. They're not as historically accurate or as finely sculpted as the Crusader ones, but on the tabletop they'll look just as good.

1st Corps


Friday, 3 May 2019

Rubicon 28mm 75mm Pak40 Anti-Tank Gun - Part Two

I somewhat lost my painting mojo with this model, due I believe to the perceived poor standard of the figures. All in all, the gun languished on the corner of my painting table for many weeks.

I finally got going again after I bought myself a PSC Dark Yellow rattle can intending it to be used to speed up the finishing of numerous Wehrmacht vehicles kits I still have to build.


To try out the can I painted the gun and it finished it off a treat. A coat of sepia wash over the top and you could really see the detail in the Rubicon kit.


This fired me up and I was determined to finish things off.

I decided to leave three of the five crew figures removable from the base (so they were glued to the pre-cut round bases. The other two would be permanent fixtures, so the central base was glued into it's pre-cut hole. The bases were all given a coat of PVA and covered in fine sand.


I also have a PSC German Field Grey rattle can so the figures all received a coat of this as a starter.


When I looked once more at the smocks the figures are sculpted wearing, I felt that my original idea of just leaving them field grey would not work. This meant I'd have to paint one of the complex camo patterns on all five figures.....this left me feeling apprehensive.


Looking at my reference books I found the Summer Oak Leaf pattern on this type of smock and the way I simulated it was;-

  1. Base coat of PSC Field Grey (sprayed)
  2. 30% of surface covered with an Army Painter Monster Brown (a mid, "pinky" brown colour)
  3. 30% of remaining surface covered with Vallejo Game Camo Green (a "yellowy" green I usually use to represent grass on small scale bases)
  4. Random dots of Vallejo Game Heavy Dark Green (like a dark British Racing Green) over all surfaces
  5. Overall coat of Army Painter Military Wash (a dark greenish wash)
The overall effect I think looks just right at wargaming distances and took no time at all!


The base was painted with a craft acrylic brown colour ("Coffee Brown") dry-brushed with Iraqi Sand. There are a number of shell boxes (open & Closed), shell cases and ready to use shells which can all be added to bring the model to life.


Finally after varnishing (on reflection I need to apply the Matt finish again as there is a slight sheen picked up under the lights), the addition of flock + a few tufts completed the model. I am now happy with the finished article and enthused enough to get back on with my 28mm Bolt Action/COC pile of shame!


Wednesday, 2 January 2019

Warlord Games - 28mm SDKFZ 251 C Half-Track

This model was one of the first (if not the first) injection moulded AFVs that Warlord produced for their Bolt Action range.


To my shame I bought it straight away (£15 at Crusade 2013 I think) and then put it on the shelf and forgot about it.

Very few parts....a really quick build project!
With my new found enthusiasm for 28mm it finally made its way onto the bench along with the other German vehicles I've described previously.

Worth holding the two hull parts together whilst the glue dries.
A simple model to assemble, with just enough detail for a wargames piece I found it a pleasure to build.

I kept the camo pattern simple on this one. Dark Yellow with green overspray.
It includes a figure firing the on board MG (MG34 or MG42 - both are supplied), but no one for the driver's seat.

The figure is a bit basic, but careful painting helps and its more than adequate
There are basic decals include together with some stowage (Jerrycans, helmets, spare wheel etc.).


The track and running gears units are moulded as one part and require some careful painting. The interior is best painted before assembly as it is difficult to access afterwards.

Altogether a good little model. Recommended.

Warlord Games - 28mm 38T Hetzer

This model only cost me £12 whilst at Colours in September. Once again this is a collaboration between Warlord Games & Italeri.


However, I suspect that this time, there is rather more Italeri input into the design than Warlord, as it is a more complex kit with a variety of options.

The kit comes in a surprisingly large box and can be built up either as a standard mid/late production Hetzer tank destroyer, Flammpanzer 38(t) or 2cm FlaK auf Hetzer reconnaissance/AA vehicle.


The later model has an open topped hull and interior detail and would probably lend itself to conversion to a recovery variant or experimental APC.

This is a more complex kit to build that the others and at times location requires holes to be drilled or cut out before assembly. And depending which variant you build, there will be a fair few parts to add to your spares box.


Gone are the simple pre-assembled running gear of the previous two models, this one needs to be built up wheel by wheel. An activity that requires patience and care to ensure alignment. The tracks themselves are in four parts per side and need care to ensure the joins are as invisible as possible.


The upper body I felt was 1mm too short and left a tiny gap at the rear between it and the lower hull, but this was easily disguised.


Included is a head & shoulders figure for the commander. It was here that I became suspicious of the scaling of the model as this figure looks way bigger than the commanders of the previous two kits. 


When placed alongside the Panzer IV for instance, the Hetzer looks quite large and I'm not convinced it is true 1/56th scale.....probably nearer 1/48th.


All the same it is a good model and really looks the part. I was going originally to finish in an ambush pattern as per the box art, but in the end settled for the same standard camouflage as the others two models.


There are a good selection of decals included as well as data cards and damage markers (coloured cotton wool) which is a nice touch.

I made up the 2cm gun as it was such a nice model in its own right. Assembled carefully it rotates and elevates and includes separate magazines of spare cartridges. I'm sure I will find a use for it at a later date. I guess if you chose to build this option you would have to find a crew from somewhere else as none is included with the kit.


Usually retailing for £20 this was exceptional value for £12 and will soon grace my toy battlefields with its compatriots.


28mm Die-cast Kubelwagen

Whilst at Reveille II in November I picked up a die-cast model of a Kubelwagen for the princely sum of £2.


This model - manufacturer unknown - had been produced to quite a high standard in Panzer Grey, with nice decals that even included the tyre pressures!

I decided to simply weather the finish a bit and add a driver figure before adding it to my 28mm collection.

There were two bright metal parts on the steering that had to be painted over in Panzer Grey but other than that it was a case of adding dark wash to the recessed/shadow areas followed by a light dry-brush of Iraqi Sand.

The driver was a cut down Warlord Games kneeling plastic German. With his legs removed he fits in a treat.

Another bargain addition. Keep an eye out at you local car boot sale....you never know what might turn up!

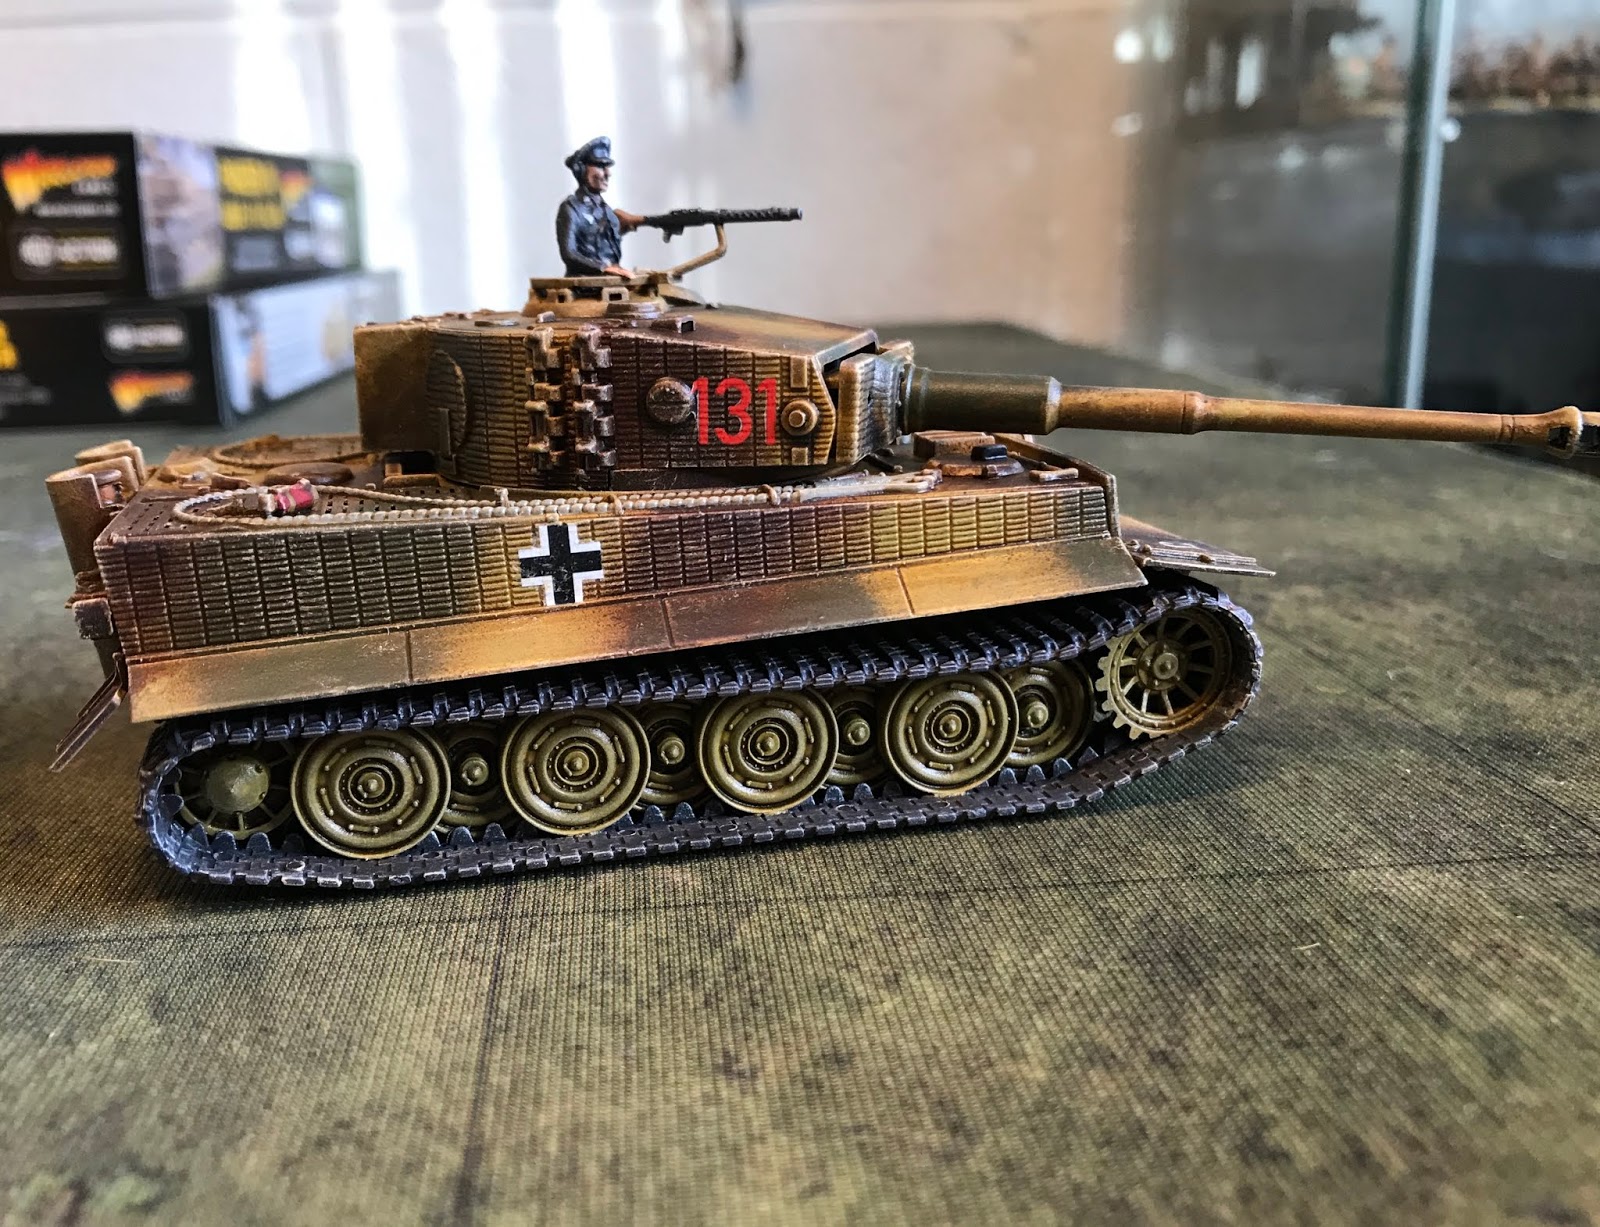
Warlord Games - 28mm Tiger I Ausf E

Next on my list was the Tiger I Ausf E.

As with the Panzer IV, this kit is moulded in a neutral grey polystyrene. Once again I primed the parts whilst still on their sprues and left the tracks off until the hull & turret were completed.


Luckily this mark of Tiger has the steel rimmed wheels so there were no rubber tyres to pick out in dark grey.


The hull (and turret) has some nice Zimmermit detail already moulded on, which picks up the dry-brushing nicely.
 

I used the supplied commander figure, who whilst a little slim, looks OK once painted up.


An extensive decal sheet is included with the kit, and I guess would benefit from one of the decal softening products to help them settle better into the Zimmermit contours. I really must invest in some of this stuff....


The finished model is very imposing on the table and I'm very pleased with the end result.


At around £18-20 to buy, it presents good value for money and is an easy, straight forward model to build. Highly recommended.