I splashed out nearly £400 on a Creality Ender 5 Pro, from Technology Outlet in the UK.
This came as a part-assembled kit, well packaged and taking only an hour to fully assemble ready to go.
So far I have to be honest that I have had some issues with filament feed that are not fully resolved as yet. So far Technology Outlet's support (via e-mail) has been good, but we're not there yet.
One of the BIG issues I had (if not THE biggest issue) with my original Wanhao i3 Mini was bed adhesion. It had no heated bed so I was dependent on glue sticks etc. In the end I adopted a covering of masking tape topped with double sided sticky tape. This worked well but the tape residue was very difficult to remove.
The other issue was the tiny print bed, which limited me to 1/100 scale models at the very largest.
Two features of my next 3D printer would have to be;-
- Heated bed
- Large print area
The Ender 5 Pro has both 😁 (in fact the print bed is 220x220x300mm)
Now until now I've always been in the hands of these clever souls who can either design 3D models from scratch (what a skill to have!!) or those who are able to tinker with existing designs to make them easier to print.
For the uninitiated, printing for example, a tank hull as one piece will require your 3D slicing software to attach supports to the print to hold up overhangs and gaps (i.e. mudguards) while the printing material is built up.
Afterwards this need to be removed which can be a bit of a pain. I've seen people raise this as an issue with Butler Printed Models...but it's unavoidable if you print one-piece.
Recently there has been more activity with people designing from the floor up models that are broken down into pieces so they can where ever possible, be printed without the need for support. In addition some helpful characters have take existing one-piece designs and "chopped" them up into parts to achieve the same result.
Until now, I had to hunt these highly desirable re-designs down on where ever I could. But maybe not any more!
After reading a brief post on Facebook, I realised that there was a free to use Microsoft 3D editing package - 3D Builder. This, apparently, was one of the easiest apps in which to slice up 3D models ready for printing. In fact you can design with it, and print direct from it if you wish.....all too much for me to cope with just now!
However the slicing function excited me.
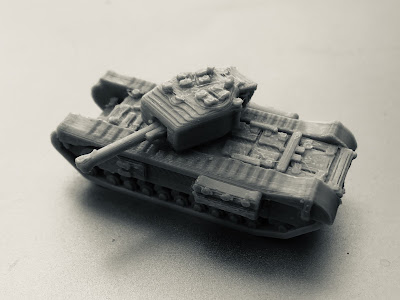
So last night I bit the bullet. I took the simple version of Marco Bergman's Churchill IV in 1/200th scale and set about making it an easy print version for my 1/144th scale What a Tanker collection.
It took a little while to get the hang of the tools, but I have to agree it is very easy to use. First, I enlarged the model from 1/200th scale to 1/144th by enlarging it 150%. Then I took the hull and sliced off the running gear panniers from each side and laid them down on their inner faces. I also sliced off the turret boss from the turret.
The model was now in five pieces and saved as 5 separate .stl files.
These were imported into Cura, my 3D Slicing software of choice, and turned into a single G.Code file ready for printing.
This morning the model took just 1 hour 40 minutes to print out perfectly!
 |
| You'll probably spot that I sliced a little too close to the turret boss recess! |
Once completed this easily pulls off, a quick bit of tidying up and it was ready to glue together. The material I use is PLA which is best glued with superglue.
The finished (unpainted) model is here for you to see. I now feel a whole new chapter of model editing is opening up to me and I cannot wait!


No comments:
Post a Comment