Well it was finally time to give my Panzer Grenadiers their baptism of fire. Their order of battle is shown in the previous blog entry - the only difference was (due to the board being slightly smaller than the
Hit The Dirt book specified) all the platoons were dropped down to 2 squads + PC, and three Panzer IIIs were substituted for my Stugs.
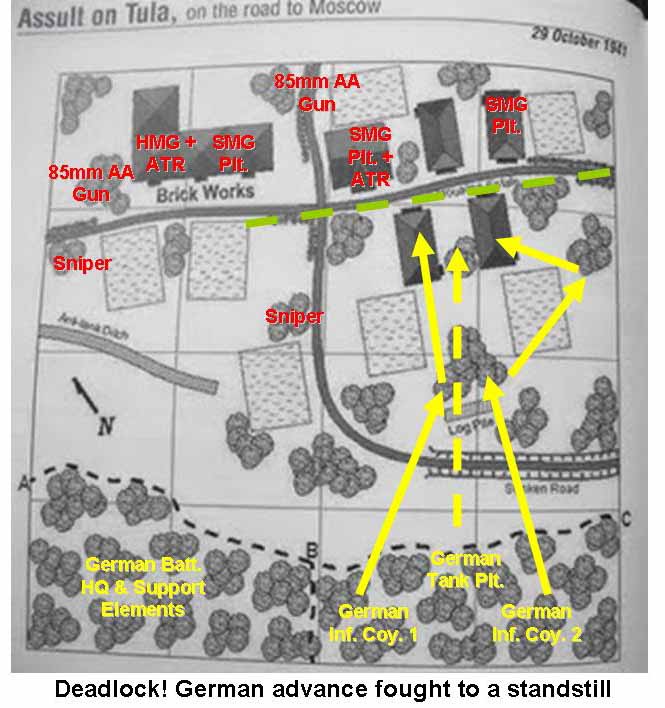
The opposition were a mixed bunch of my Soviet PSC Infantry - making their first outing too. The troop types and their positions are indicated on
Map 1. below.
 |
| Map 1. |
I opted to command the Russian forces whose objective was to hold on to the buildings at all cost! Si's German Forces had simply to capture them!
The Panzer Grenadiers deployed mainly to the Eastern side of the wooded area at the base of the map, whilst the Soviets were afforded hidden deployment and marked on a map.
I had planned what I hoped would be a classic defence in depth to wear the German advance down and hopefully lead to victory through attrition! (Yeh right...)
 |
| Map 2. |
As shown in
Map 2. the German's started with the initiative and advanced across the sunken road dealing with my first rifle platoon on the way.
 |
| German armour South of the sunken road and the remnants of the Soviet Rifle Platoon defending the wood |
 |
| Map 3. |
My next stalling action was the second rifle platoon hidden in woods behind the log pile. These succeeded in slowing the German advance with the PIN result, but did little in the way of damage until an attempted close assault by German forces brought an unexpected KILL result for the Soviets.
 |
| Map 4. |
This was only a temporary setback for the German advance. The wood was cleared and the advance continued with only an occasional PIN result inflicted by a hidden Soviet sniper.
 |
| Having cleared the woods the Germans pursue the Soviets as they withdraw | |
|
|
 |
| German forces flanking right through wooded cover |
 |
| Map 5. |
The Germans now assaulted the first two buildings which both housed HMG teams. These had caused nothing more than PINs as the enemy advanced towards them ..... I really must practice rolling higher scores.
 |
| Map 6. |
The only Soviet survivor from the house assault was a single 14.5 ATR team who legged it to the house behind. Now Si brought up the supporting armour ready for the final assault on the second line of houses.
 |
| The German Infantry consolidate in the captured houses whilst the MkIIIs manoeuvre up for the attack |
 |
| Map 7. |
Now it was Si's time to put in a right flanking attack and start rolling up the Soviets building by building with support from the troops now in the captured buildings and the MkIIIs.
 |
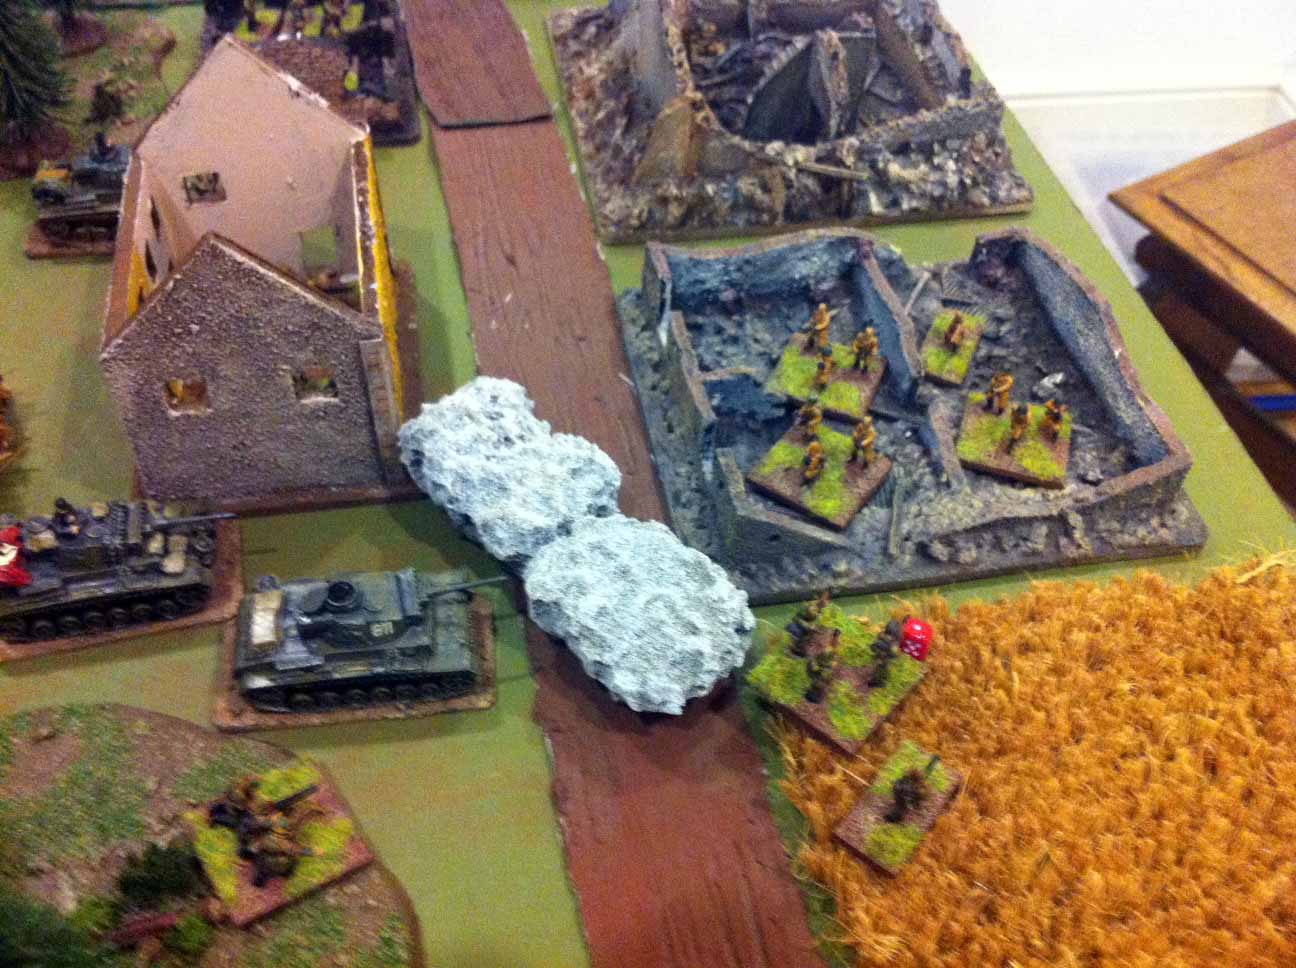
| Under cover of smoke, the assault went in. |
What the Germans weren't expecting was a three base SMG Platoon and me finally rolling a couple of decent dice. Up close the SMG fire was murderous, successfully breaking up the attack. See
Map 8.
 |
| Soviet SMG squads safe in their defended ruin. |
 |
| Map 8. |
All this time the two 85mm AA guns I'd sited to cover the road approach and the open area to the front of the AT Ditch had seen no action other than some ineffective German mortar fire. The snipers continued to harass the German HMG platoon, but no-one else on the West of the board saw any action.
 |
| Map 9. |
By this point the Germans were running out of both options and time (it was way past my bedtime). They had withdrawn to the other side of the West/East road to rally (see Green Line
Map 9.). It was hard to see how the Germans were going to prise the Soviet SMG teams out of their fortresses. So at that point we decided to call it a draw.
This had been a very enjoyable evening's wargaming. Surprisingly for a defensive/offensive game the Soviets were busier than you'd think. I never felt out of the game and drew strength from the fact that by using real life tactics (i.e. defence in depth) I was producing results even through I suffered my usual appalling dice rolls.
So now I've had a go at Infantry actions.....FIBUA (or FISH - fighting in someone's house!) and seen the deployment of some armour.
Time to get on and finish those PSC Russians so I'm not so out numbered next time........


Nice writeup and pics. Figures and tables look good as well. I had a copy of Crossfire for a while but never got round to trying them. I think my Desert stuff is likely to be BKC2.
ReplyDeleteAll the best
Andy
Good write up and nicely presented with the scenario map. I like your smoke too!
ReplyDeleteGreat AAR. I really enjoyed it.
ReplyDelete