The kit comes in the usual illustrated box packaging.
On the back of which are some views of the finished kit rather than the usual exploded assembly diagram.
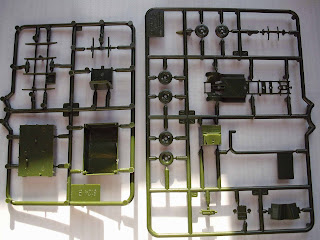
The box contents were a change for the Zvezda 1/100 models I've built so far, in that there are TWO sprues of parts, a separate assembly instruction sheet and the Art of Tactics data card.
The two sprues are moulded in a dark green polystyrene of a slightly stiffer variety than their German counterparts have been lately. Both are crisp and virtually flash free and somewhat easier to trim and clean up with a file.
Step One: Cut the cab parts from the sprue - cab body & roof + Engine block(!).
As ever, these parts would simply clip together but I used polystyrene cement just to be sure. I cannot understand why they've gone to the trouble of moulding an engine block when they've moulded the cab with solid windows? What might have been better would have been to mould this part in clear plastic so you could paint it leaving the windows clear?
Step Two: The bonnet is moulded in one, but needs to be folded to fit over the engine block (see below).
Step Three: Next it was time to assemble the cab and wheels onto the chassis.
You may be able to see in the picture above that I'd painted the wheels and tyres before assembly. Be careful to follow the instructions and identify the front and rear wheels correctly. The rear set are double tyred. I found it easier to stick the wheels to the axle/spring assemblies first and then stick the whole assembled axle onto the chassis. The axles are beautifully moulded but delicate all the same, take care!
Whilst not obvious from my photos, I actually attached the cab assembly to the chassis first, before fitting the axle assemblies.
Step Four: Complete the cab by fitting the radiator onto the front of the engine block and then the folded bonnet over the top.
Step Five: All that's now left to do is assemble and fit the load bed and tilt. This kit also appears with the rocket launching array to make a Katusha Rocket Launcher - all that differs between that kit and this is the inclusion of the rear body.
Assembly couldn't be simpler - glue the load bed to the chassis frame and (if you want) glue the tilt to the load bed. The planking detail is all there so it's quite feasible to leave the tilt off.
And there you are! Finished. To paint the model I gave the bodywork a coat of Vallejo Russian Green, followed by the usual Sepia Wash and then a heavy dry-brush of Russian Green + White. The tilt was painted Khaki and weathered accordingly.
I said I'd got a plan for the truck? Well it was to use it on a command base that I'd earlier populated with a T26. Now I wanted to free the T26 up to fight, so I did a quick swap.
Here is the finished article based with some PSC 15mm Russian Infantry.In Conclusion.
Pro's
- Quick and easy to build
- Readily available at the model shop
Con's
- Maybe solid cab windows? (though to be fair any resin truck model will be solid so is it a problem?)
To be honest I loved this little model, I think it's great. If you need trucks in your game, look no further.


Nice work!
ReplyDeleteI recently came across your blog and have been reading along. I thought I would leave my first comment. I don't know what to say except that I have enjoyed reading. Nice blog. I will keep visiting this blog very often. accident on 24 south massachusetts
ReplyDeleteThanks Raif, comments are always appreciated
Delete