I needed an opportunity to try out my new FiB Brits so we decided to game the Scottish Corridor - Grava, France scenario from '
Hit the Dirt'. The actual scenario calls for a 4 x 4' table, but as we only had 3 x 3' available to us, we opted to fight out the top left section of the battlefield with reduced orders of battle.
 |
| The battlefield looking West to East |
The scenario is set on 27th June 1944 during Operation Epsom and sees a Company of the 2nd Argyle Highlanders defending against a counter-attack from the 10th SS Panzer Division.
The British forces consisted of 2 Platoons + HMG, 3 snipers, 3" Mortar battery & 6 Pounder in support. Their objective was to hold on to the three orchards (Marked with a 'C') until nightfall - 4 hours - using the
HtD variable clock mechanism.
The Germans had 3 platoons, HMGs & Mortars as well as a Panther and two Panzer IV's in support. They simply had to capture the orchards before 7pm.
The German infantry deployed across the start line and advanced forwards. A sniper in the first building they came to, caused a suppression, but failed to significantly slow them down.
Soon their armour appeared. The Panther going straight up the axis of advance, the Panzers going right flanking.
 |
| Initial German deployment in sunken lane top right. |
The Brits engaged the German infantry with the four squads and the HMG, leaving their two pronged attack pinned in the centre woods and the crops to the British front.
The Germans now relied on their armour to flush out the British resistance.
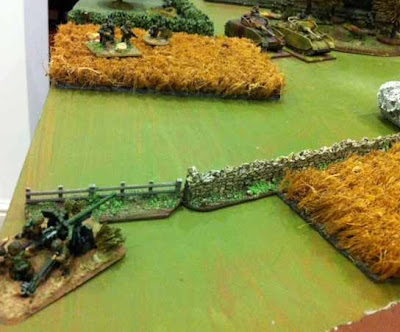 |
| The 6 Pounder getting ready to hit the first AFV to appear |
The Panther exposed it's right flank to the 6 Pounder and received a pin for it's trouble.
The Panzer IV's were more canny and remained out of line of sight.
 |
| Using the cover of the crops, the Panzers wait their chance to assault the 6 Pounder. |
The weight of the German assault on the right caused the British to fall back, not before they lost their 6 Pounder. At the same time the German left flank attack on the orchards, commenced.
 |
| 6 Pounder falls to the Panzer IV's |
Uncertain of their level of cover, the Brits withdrew to the second orchard. The squads on the British left continued to keep the German infantry at bay, but it would only be a matter of time before they were over-run by the armour as they had no anti-tank weapons.
 |
| British Platoon awaits the attack on their orchard |
The Brits were pushed back, taking refuge in and around the church.
 |
| Pinned down, the covering squad eventually rallied and escaped to the church |
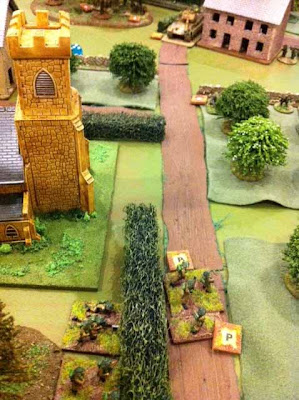 |
| Withdrawing under covering fire towards the church. |
Now at this point, the British still had their force intact - less the 6 Pounder- however they no longer held any of the orchards. With no anti-armour capability it was unlikely they would be able to retake the orchards by force and would most likely have continued their fighting withdrawal, so it was decided that the game was over - a victory to the German forces.
In 1944, Maj McElwie and his force of Highlanders succeeded in holding off the German counter attacks until they were able to withdraw at nightfall, not before they had destroyed a Panther with a PIAT!
All-in-all a very enjoyable game - well done Si....one to you!


Nice report, pics and table. Looked a good game.
ReplyDeleteNice report. Why would the Panthe expose is flank? The six pounder was hidden presumably?
ReplyDeleteCheers Andy.
ReplyDeleteI'd definitely recommend giving Crossfire a try. Certainly gets you thinking!
All the British deployments were hidden. Bases only exposed when they fired or if they were exposed through recce by fire.
ReplyDeleteI intended the 6 Pounder being hidden near the fence, though I know the position looks fairly open. My opponent very gratiously allowed me to get away with it!
I really enjoyed your use of maps and photos to show the flow of the battle. I tried something similar, but no where as effective. I may steal your method! See:
ReplyDeletehttp://kingstonirregulars.blogspot.com/
Dick Bryant
Nice blog, Dick. What software package do you draw your maps in?
ReplyDeleteFeel free to give my method a try, I look forwards to the results.
Tim