Well I'd been waiting for the Hereford Model Centre to get these in ever since I'd first seen them announced. I bought a single Battlefront example a few years ago and then bought a crew to go with it from ebay, but couldn't face the thought of buying multiple resin items as they'd cost me a small fortune.
Of all the vehicles used in WW2 this halftrack optimises for me, the German Army and their Panzer Grenadier Units. And of all the models PSC have produced this, for my money, has to be their best so far!
The five models took me 10 days to do justice so I'm afraid I'm going to subject you all to a rather indulgent write-up!!
First thing, on opening the box, I was impressed to see how "busy" the sprues were. This is by far the most complex PSC kit I've built so far.
Each basic vehicle (less weapons, crew and stowage) comprises of 16 parts, whereas the Zvezda example I built in October was only 8 parts. The mouldings were all flash free and really crisply detailed. Each sprue, as well as the vehicle parts, includes the following;-
- 2 seated crew figures (Driver & Co-driver)
- 5 Crew figures (4 seated + One standing manning the MG42)
- 3 packs & a rolled tarpaulin
- Spare Tyre & Track section
- 4 Jerrycans
- 2 Kar98K Rifles & a Panzerschreck
- 2 separate MG42's (One with AA mount for the rear)
Straight away I could see that you could make these little beauties into individual masterpieces - no two the same!
 |
| The lower hull (top), hull floor (nearest camera) seats and storage hoppers & Driver/co-driver figure |
The first step was to assemble the vehicle hull. There is so much interior detail here that the only way to paint it, and do it justice, was to do this before you attach the upper hull.
 |
| Lower hull pieces assembled, painted and washed. |
As an opened top vehicle you will be able to see all the internal detail when finished so it really is worth taking the trouble.
 |
| Lower hull assembly with the upper hull ready to attach. Both assemblies painted inside. |
To speed things up a little I only painted the rears of the figures! The lower hull has a separate tow bar to attach - worth fitting it now before you forget it!
 |
| Upper & Lower hulls joined |
Once all the painting was dry I attached the upper hull to the lower hull assembly - as with all the assembly - using Revell Polystyrene cement from one of those nice needle applicators.
 |
| The benches were painted brown to simulate wooden slats |
The interior was painted Vallejo Dark Yellow and washed with diluted Vallejo Sepia Wash.
The next step was to attach the banks of lockers along each side of the vehicles. It is clear which one goes on which side, and they simply butt up against the upper hull joint to locate them. You can see that I'd painted these off the vehicles but actually needn't have bothered.
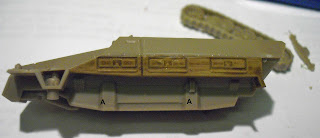 |
| Side lockers in place. The locating bars for the track units indicated "A". |
Now it's time to attach the track units. These are "sided" - the drive sprocket being towards the front of the vehicle when fitted.
 |
| The track units are located using the moulded bars marked "A". Also note the front axle has been fitted |
They simply glue onto the hull sides and are locate over the moulded bars shown above.
Also fit the front axle while you're there. Then, lastly, add the front wheels to complete the basic assembly.
Well that's all for part one! Next we get to finish the vehicle.........


looking forward to it, I still have my 15 sdkfz to assemble.
ReplyDeleteBeautifully done!
ReplyDelete